Build And Package With Docker
Here in this tutorial I am going to show you how to create a simple Spring Boot application. Then how to build, package and run this Spring Boot application with Docker in Linux environment (CentOS). I am going to use both gradle and maven as build tools for running build on this Spring Boot application.
In my previous tutorial I had discussed how to install docker on CentOS 7. I am not going to tell you here why do you need docker but you can read it from my previous tutorial.
Here I will first create a Spring Boot application that returns Hello, World! from the REST service. You can use any favorite IDE or tool of your choice to create the project.
Next step will be to upload the project folders/files into your remote server where CentOS is running.
Then you need to create a Dockerfile to build your Spring Boot application, followed by creating the image for your application.
Finally you need to run the container (Spring Boot application) and access the URL to get the response from the REST API.
Prerequisites
Java 11/19, Gradle 6.6.0, Maven 3.6.3/3.8.7, Spring Boot 2.3.3/3.1.2
Spring Boot Application
I am not going to explain here how to create Spring Boot application but I am sharing the source code here.
Spring REST Controller
The following REST controller has GET API exposed that returns Hello, World! as a response when invoked.
A class with main method and @SpringBootApplication annotation is required to deploy and run the application.
package com.roytuts.spring.boot.hello.world;

import org.springframework.boot.SpringApplication;
import org.springframework.boot.autoconfigure.SpringBootApplication;
import org.springframework.http.HttpStatus;
import org.springframework.http.ResponseEntity;
import org.springframework.web.bind.annotation.GetMapping;
import org.springframework.web.bind.annotation.RestController;

@RestController
@SpringBootApplication
public class App {

	public static void main(String[] args) {
		SpringApplication.run(App.class, args);
	}

	@GetMapping("/hello")
	public ResponseEntity<String> hello() {
		return new ResponseEntity<String>("Hello World!", HttpStatus.OK);
	}

}
Build Script/File
You can use either gradle or maven build script/file as given below.
build.gradle
buildscript {
	ext {
		springBootVersion = '2.3.3.RELEASE'
	}

    repositories {
    	mavenCentral()
    }

    dependencies {
    	classpath("org.springframework.boot:spring-boot-gradle-plugin:${springBootVersion}")
    }
}

plugins {
    id 'java-library'
    id 'org.springframework.boot' version "${springBootVersion}"
}

sourceCompatibility = 11
targetCompatibility = 11

repositories {
    mavenCentral()
}

dependencies {
	implementation("org.springframework.boot:spring-boot-starter-web:${springBootVersion}")
}
pom.xml
For spring boot 3.x version use the following pom.xml file:
<?xml version="1.0" encoding="UTF-8"?>

<project xmlns="http://maven.apache.org/POM/4.0.0"
	xmlns:xsi="http://www.w3.org/2001/XMLSchema-instance"
	xsi:schemaLocation="http://maven.apache.org/POM/4.0.0 http://maven.apache.org/xsd/maven-4.0.0.xsd">
	<modelVersion>4.0.0</modelVersion>

	<groupId>com.roytuts</groupId>
	<artifactId>
		spring-boot-hello-world</artifactId>
	<version>0.0.1-SNAPSHOT</version>

	<properties>
		<project.build.sourceEncoding>UTF-8</project.build.sourceEncoding>
		<maven.compiler.source>
			19</maven.compiler.source>
		<maven.compiler.target>19</maven.compiler.target>
	</properties>

	<parent>
		<groupId>
			org.springframework.boot</groupId>
		<artifactId>spring-boot-starter-parent</artifactId>
		<version>
			3.1.2</version>
	</parent>

	<dependencies>
		<dependency>
			<groupId>org.springframework.boot</groupId>
			<artifactId>
				spring-boot-starter-web</artifactId>
		</dependency>
	</dependencies>

	<build>
		<plugins>
			<plugin>
				<groupId>
					org.springframework.boot</groupId>
				<artifactId>spring-boot-maven-plugin</artifactId>
			</plugin>
		</plugins>
	</build>
</project>
For spring boot 2.x use the following pom.xml file:
<project xmlns="http://maven.apache.org/POM/4.0.0"
	xmlns:xsi="http://www.w3.org/2001/XMLSchema-instance"
	xsi:schemaLocation="http://maven.apache.org/POM/4.0.0 http://maven.apache.org/xsd/maven-4.0.0.xsd">
	<modelVersion>4.0.0</modelVersion>

	<groupId>com.roytuts</groupId>
	<artifactId>spring-boot-hello-world</artifactId>
	<version>0.0.1-SNAPSHOT</version>

	<parent>
		<groupId>org.springframework.boot</groupId>
		<artifactId>spring-boot-starter-parent</artifactId>
		<version>2.3.3.RELEASE</version>
	</parent>

	<properties>
		<project.build.sourceEncoding>UTF-8</project.build.sourceEncoding>
	</properties>

	<dependencies>
		<dependency>
			<groupId>org.springframework.boot</groupId>
			<artifactId>spring-boot-starter-web</artifactId>
		</dependency>
	</dependencies>

    <build>
        <plugins>
			<plugin>
				<groupId>org.apache.maven.plugins</groupId>
				<artifactId>maven-compiler-plugin</artifactId>
				<version>3.8.1</version>
				<configuration>
					<source>11</source>
					<target>11</target>
				</configuration>
			</plugin>
		</plugins>
	</build>
</project>
Upload Project into Server
Next step is to upload your project folders/files into remote server where Linux (CentOS) server is running. You can use FileZilla or any other software according to your OS to upload your file to remote machine. Or evn you can manually create folders and files to copy your code to the Unix console.
You need to upload only build.gradle script or pom.xml file and src directory from your local machine.
Let’s say you have uploaded your project files into a folder called spring-boot-hello-world in your remote machine.
Docker File
This step is very important as you need to create Docker file to build, package and run the Spring Boot application.
So I will create a docker file under the directory spring-boot-hello-world where you have uploaded your project files. The name of the docker file is Dockerfile.
If you are using gradle as a build tool then you can add the following content in Dockerfile.
FROM gradle:6.6.0-jdk11 AS build

COPY build.gradle /build/
COPY src /build/src/

WORKDIR /build/

RUN gradle build --no-daemon

FROM adoptopenjdk/openjdk11:latest

WORKDIR /app

COPY --from=build /build/build/libs/*.jar /app/spring-boot-app.jar

ENTRYPOINT ["java", "-jar","/app/spring-boot-app.jar"]
If you are using maven as a build tool then you can add the following content in Dockerfile.
For spring boot 3.x with jdk 19 use the following content for the Dockerfile:
FROM maven:3.8.7-eclipse-temurin-19 AS build

COPY pom.xml /build/
COPY src /build/src/

WORKDIR /build/

RUN mvn package

FROM openjdk:19-jdk-alpine

WORKDIR /app

COPY --from=build /build/target/*.jar /app/spring-boot-app.jar

ENTRYPOINT ["java", "-jar","/app/spring-boot-app.jar"]
For spring boot 2.x with jdk 11 use the following content for the Dockerfile:
FROM maven:3.6.3-jdk11 AS build

COPY pom.xml /build/
COPY src /build/src/

WORKDIR /build/

RUN mvn package

FROM adoptopenjdk/openjdk11:latest

WORKDIR /app

COPY --from=build /build/target/*.jar /app/spring-boot-app.jar

ENTRYPOINT ["java", "-jar","/app/spring-boot-app.jar"]
Now let’s see what each of the lines in the above Dockerfile does for your application.
The first line tells docker to use maven or gradle image as the base image for the first stage of the build. Docker will look for this image locally and if not found then will pull from DockerHub. The gradle or maven image will be discarded from the final image.
The next line copy build.gradle script or pom.xml file from spring-boot directory to build directory. Similarly does the third line.
WORKDIR /build tells docker to use build directory as a working directory. All commands now will run from this directory.
The next line builds and packages the application into executable JAR file. The generated JAR file is kept under build/libs directory for gradle build and target directory for maven build.
I have started gradle without the long-running daemon, as the daemon is best used during local development only.
For the first time when build is run gradle or maven will pull the dependencies from the public maven repository and will be cached in locally. Therefore subsequent build will be faster because it will use cached version of the image and dependencies will not be pulled again form remote repository.
The line FROM adoptopenjdk/openjdk11:latest tells docker to use openjdk11:latest as the base image for the next stage of multi-stage build. This image will be discarded from the final image of build.
WORKDIR /app tells docker to create a new working directory in the image called /app. All commands now will run from this directory.
The next line COPY --from=build ... will copy the generated executable JAR file to app directory as spring-boot-app.jar.
With multi-stage builds a Docker build can use one base image for compilation/packaging/unit tests and a different one that will hold the runtime of the application. This makes the final image more secure and smaller in size. So multi-stage builds allow you to copy specific artifacts from one build stage to another and discard everything else.
Finally ENTRYPOINT ["java", "-jar","/app/spring-boot-app.jar"] command tells docker what command will run when a container gets starter from this image. Each command is separated by comma (,). In this command I want to run the executable JAR.
Docker Image
You have defined the image in Dockerfile. So it’s time to build the image. To build docker image simply run the command docker image build -t spring-boot-docker . from your Unix shell terminal on CentOS.
The -t option in the command allows you to specify the name and tag (optional). If you do not specify any name then docker will tag the image with latest.
Running the above command will display output in the shell console as shown in the below images.
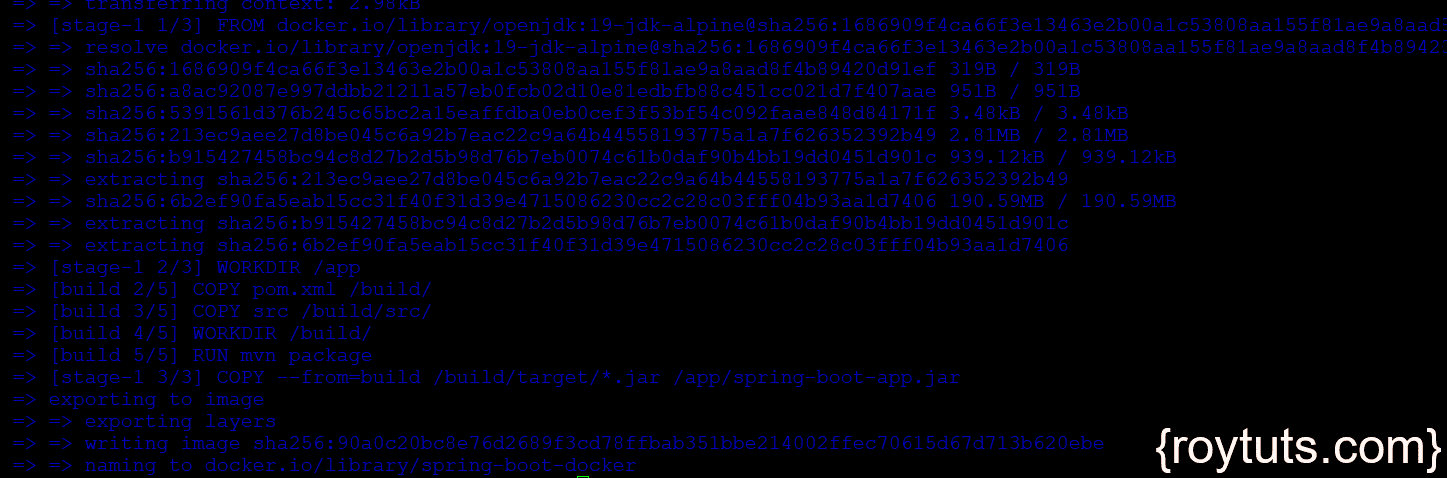
The required libraries will be downloaded or pulled from the DockerHub if any or all of the libraries do not exist or available locally. You also see that image has been created successfully with the name spring-boot-docker.
Now you can see your images by executing the command docker images. You will see similar to the following image. So the highlighted one is the image which I have created for Spring boot application. The TAG name is latest as I have not mentioned anything in the command.

Run Container
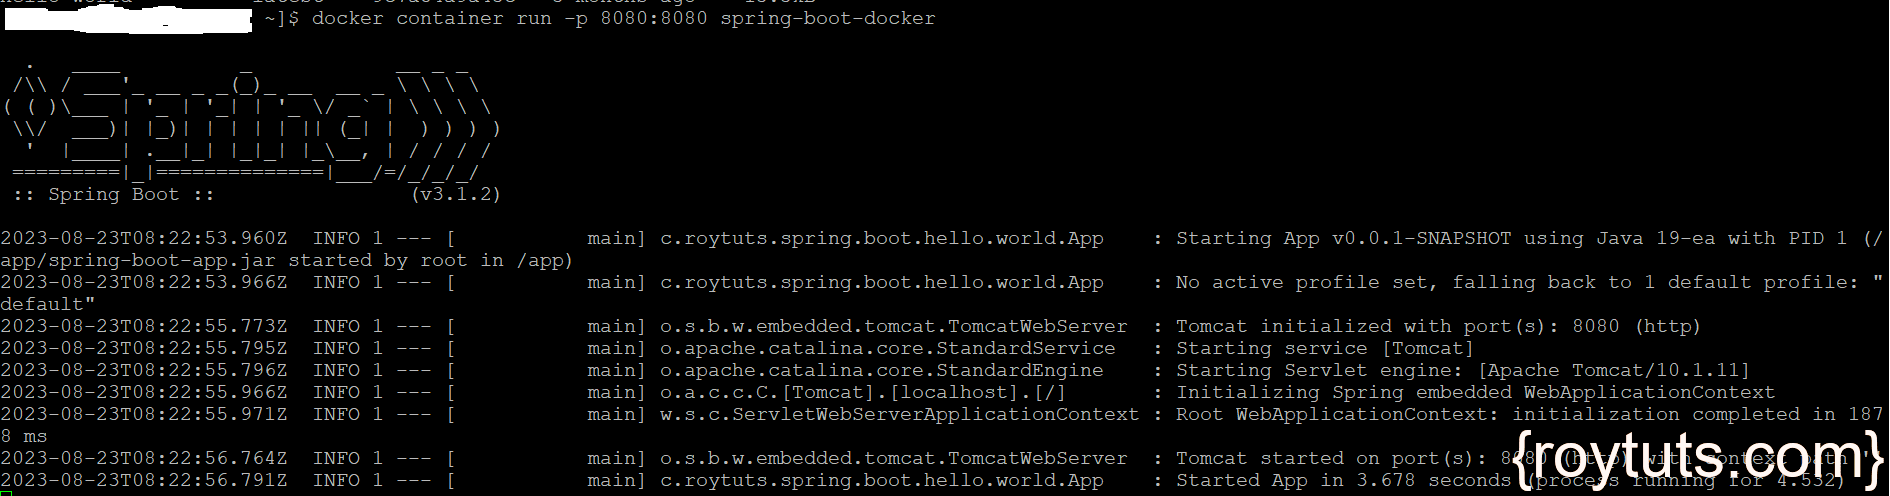
You have built the image now let’s run the container with the following command:
docker container run -p 8080:8080 spring-boot-dockerThe run command takes an optional -p parameter that allows you to map a port from the container to your host machine. As you know Spring Boot application runs on default port 8080. When you run the container, docker will run the executable JAR and the application will start on port 8080 inside the container. In order to access the application running in the container you need to map the internal container port to a port on the host machine. The -p 8080:8080 parameter maps the container’s internal port 8080 to port 8080 on the host machine.
You will see the following output with your application starts on port 8080.
Testing the Application
Now let’s see the output of your application. To access the REST API you have exposed on port 8080, you can access it on the web browser with your server ip address http://<server ip address>:8080/hello.
You will see the following output:

That’s all. Hope you got idea how to dockerize your Spring Boot application in Linux environment (CentOS).