Dockerize Spring Boot Microservices
Here I am going to show you how to use docker compose for dockerizing Spring Boot Microservices MySQL app. Docker Compose is a tool for defining and running multi-container Docker applications. With Compose, you use a YAML file to configure your application’s services. Then, with a single command, you create and start all the services from your configuration.
You know that it is a best practice for a container to have only one process with single responsibility. But as I am going to dockerize Spring Boot Microservices app and MySQL server for storing data for the app, so I need two containers – one for running the app and another one for running the MySQL database server.
So these two containers are running independently and to establish communication between these two containers you need docker compose. I am also going to show you how to install docker compose under Linux environment on CentOS operating system.
Using docker compose is basically a three-step process:
- Define your app’s environment with a Dockerfile so it can be reproduced anywhere.
- Define services that make up your app in docker-compose.yml so they can be run together in an isolated environment.
- Run docker-compose up and compose starts and runs your entire app.
Prerequisite
Java 11/19, MySQL 8.0.21/8.0.33, Gradle 6.6.0, Maven 3.8.7, Docker and Docker Compose (1.26.2/1.28.6/2.20.2) already installed
Docker Compose Installation
Use the following command to install Docker Compose in your system. I am installing it under Linux environment CentOS operating system.
You can check for the latest release version of Docker and also use.
$ sudo curl -L "https://github.com/docker/compose/releases/download/x.x.x/docker-compose-$(uname -s)-$(uname -m)" -o /usr/local/bin/docker-composeIt may ask for password and you can enter for your user’s password.
Next set the permission to make the binary executable using the following command:
$ sudo chmod +x /usr/local/bin/docker-composeFinally verify that the installation was successful by checking the version using the following command.
For Docker version 2.x.x, use the following command:
$ docker compose versionIt will show you the following information:
Docker Compose version v2.20.2For Docker version 1.x.x, use the following command:
$ docker-compose --versionIt will show you the following information:
docker-compose version 1.26.2, build eefe0d31Or
docker-compose version 1.28.6, build 5db8d86fMySQL Script
First thing I am going to create is an SQL script that will be used to create your required table in the MySQL database server.
I have created below SQL script under db folder:
CREATE DATABASE IF NOT EXISTS `roytuts`;
USE `roytuts`;

CREATE TABLE IF NOT EXISTS `flag` (
  `flag_id` int unsigned NOT NULL AUTO_INCREMENT,
  `flag_val` varchar(30) NOT NULL,
  PRIMARY KEY (`flag_id`)
) ENGINE=InnoDB AUTO_INCREMENT=2 DEFAULT CHARSET=utf8mb4 COLLATE=utf8mb4_0900_ai_ci;

INSERT INTO `flag` (`flag_id`, `flag_val`) VALUES
	(1, 'true');
Please make sure you follow the directory structure as given in the source code.
Spring Boot Microservices
Here I am going to show you how you can communicate with microservices and how Eureka server is going to discover them and register them. I am also going to show you how to communicate to MySQL server from microservice through container.
Echo Service
This service just echos the message passed to the path variable in REST API. I am not going to show whole source code here but you can always download the whole source code from Github repository.
@RestController
@SpringBootApplication
public class EchoServiceApp {

	public static void main(String[] args) {
		SpringApplication.run(EchoServiceApp.class, args);
	}

	@GetMapping("/echo/{msg}")
	public ResponseEntity<String> echo(@PathVariable String msg) {
		return new ResponseEntity<String>("Your message, " + msg, HttpStatus.OK);
	}

}
The application.properties file is given below. Notice I have used eureka in the defaultZone to communicate with the Eureka server instead of localhost, because the localhost is only visible inside the container.
spring.application.name=echo
server.port=9000

eureka.client.serviceUrl.defaultZone=http://eureka:8761/eureka
I have written shell script to wait for the eureka server startup because otherwise your microservices will throw exception and won’t be able to register.
I have used netcat (nc) command to check whether the eureka server is up or not and wait for 3 sec before checking repeatedly. Finally when eureka server is up I am starting the echo service app using the last command java -jar echo-app.jar.
#!/bin/sh

while ! nc -z eureka 8761; do
    echo "Waiting for the Eureka Server"
    sleep 3
done

java -jar echo-app.jar
Dockerfile for the echo service is written below. In the below I have pulled the required images, such as, Gradle, JDK, etc. then copy all files to the app directory.
Netcat command is not found inside the container so before executing the nc command in shell programming you need to download and install it.
For Docker 2.x.x, Maven 3.8.7 and Spring Boot 3.x.x, use the following content:
FROM maven:3.8.7-eclipse-temurin-19 AS build

COPY pom.xml /app/
COPY src /app/src/

WORKDIR /app/

RUN mvn package

FROM openjdk:19-jdk-alpine

COPY --from=build /app/target/*.jar echo-app.jar

RUN apk update && apk add --no-cache netcat-openbsd

COPY wait.sh /wait.sh
RUN chmod +x /wait.sh
For Docker 1.x.x, Gradle 6.x.x and Spring Boot 2.x.x, use the following content:
I have used command RUN apt-get update && apt-get install -y netcat for this purpose. I copied the sh file and changed the permission for execution.
FROM gradle:6.6.0-jdk11 AS build

COPY build.gradle /app/
COPY src /app/src/

WORKDIR /app/

RUN gradle build --no-daemon

FROM adoptopenjdk/openjdk11:latest

COPY --from=build /app/build/libs/*.jar echo-app.jar

RUN apt-get update && apt-get install -y netcat

COPY wait.sh /wait.sh
RUN chmod +x /wait.sh
Hello Service
This microservice just say you hello. So you need to pass your name in to the path variable for the REST API.
@RestController
@SpringBootApplication
public class HelloServiceApp {

	public static void main(String[] args) {
		SpringApplication.run(HelloServiceApp.class, args);
	}

	@GetMapping("/hello/{name}")
	public ResponseEntity<String> hello(@PathVariable String name) {
		return new ResponseEntity<String>("Hello, " + name, HttpStatus.OK);
	}

}
Similarly for hello service I have also configured application.properties file.
spring.application.name=hello
server.port=8000

eureka.client.serviceUrl.defaultZone=http://eureka:8761/eureka
As I have explained why you need shell script in the echo service section above, so the same reason is applicable for hello service also.
So wait.sh and Dockerfile is given below.
wait.sh
#!/bin/sh

while ! nc -z eureka 8761; do
    echo "Waiting for the Eureka Server"
    sleep 3
done

java -jar hello-app.jar
Dockerfile
For Docker 2.x.x, Maven 3.8.7 and Spring Boot 3.x.x, use the following content:
FROM maven:3.8.7-eclipse-temurin-19 AS build

COPY pom.xml /app/
COPY src /app/src/

WORKDIR /app/

RUN mvn package

FROM openjdk:19-jdk-alpine

COPY --from=build /app/target/*.jar hello-app.jar

RUN apk update && apk add --no-cache netcat-openbsd

COPY wait.sh /wait.sh
RUN chmod +x /wait.sh
For Docker 1.x.x, Gradle 6.x.x and Spring Boot 2.x.x, use the following content:
FROM gradle:6.6.0-jdk11 AS build

COPY build.gradle /app/
COPY src /app/src/

WORKDIR /app/

RUN gradle build --no-daemon

FROM adoptopenjdk/openjdk11:latest

COPY --from=build /app/build/libs/*.jar hello-app.jar

RUN apt-get update && apt-get install -y netcat

COPY wait.sh /wait.sh
RUN chmod +x /wait.sh
DB Service
This is the service that communicates with MySQL database and fetches the value from a table called flag. So in this example you will learn how to communicate with MySQL server through container.
The application.properties file is little different for db service. I have mentioned service name (db) for connecting to the MySQL server. Again you cannot connect to the MySQL server using localhost because the MySQL server is running inside a container.
For Docker 2.x.x, Maven 3.8.7 and Spring Boot 3.x.x, use the following content:
#datasource
spring.datasource.driverClassName=com.mysql.cj.jdbc.Driver
spring.datasource.url=jdbc:mysql://db:3306/roytuts?allowPublicKeyRetrieval=true&autoReconnect=true&useSSL=false
spring.datasource.username=root
spring.datasource.password=root

spring.jpa.database-platform=org.hibernate.dialect.MySQL8Dialect

server.port=7000
spring.application.name=db
eureka.client.serviceUrl.defaultZone=http://eureka:8761/eureka
For Docker 1.x.x, Gradle 6.x.x and Spring Boot 2.x.x, use the following content:
#datasource
jdbc.driverClassName=com.mysql.cj.jdbc.Driver
jdbc.url=jdbc:mysql://db/roytuts
jdbc.username=root
jdbc.password=root

#disable schema generation from Hibernate
spring.jpa.hibernate.ddl-auto=none

server.port=7000
spring.application.name=db
eureka.client.serviceUrl.defaultZone=http://eureka:8761/eureka
The REST controller is written as follows:
@RestController
@EnableJpaRepositories
@SpringBootApplication
public class DbServiceApp {

	@Autowired
	private FlagRepository repository;

	public static void main(String[] args) {
		SpringApplication.run(DbServiceApp.class, args);
	}

	@GetMapping("/flag/{id}")
	public ResponseEntity<String> getFlagValue(@PathVariable int id) {
		return new ResponseEntity<String>(repository.findById(id).get().getValue(), HttpStatus.OK);
	}

}
As I have to wait for the eureka server to be started up first, similarly I have to also wait for the MySQL server to be started first before I can configure my database connection in Spring Boot application. So for this db service I need to check two services – eureka as well database.
So I have written following code into wait.sh file:
#!/bin/sh

while ! nc -z eureka 8761 ; do
    echo "Waiting for the Eureka Server"
    sleep 3
done

while ! nc -z db 3306 ; do
    echo "Waiting for the MySQL Server"
    sleep 3
done

java -jar db-app.jar
Dockerfile content is given below:
For Docker 2.x.x, Maven 3.8.7 and Spring Boot 3.x.x, use the following content:
FROM maven:3.8.7-eclipse-temurin-19 AS build

COPY pom.xml /app/
COPY src /app/src/

WORKDIR /app/

RUN mvn package

FROM openjdk:19-jdk-alpine

COPY --from=build /app/target/*.jar db-app.jar

RUN apk update && apk add --no-cache netcat-openbsd

COPY wait.sh /wait.sh
RUN chmod +x /wait.sh
For Docker 1.x.x, Gradle 6.x.x and Spring Boot 2.x.x, use the following content:
FROM gradle:6.6.0-jdk11 AS build

COPY build.gradle /app/
COPY src /app/src/

WORKDIR /app/

RUN gradle build --no-daemon

FROM adoptopenjdk/openjdk11:latest

COPY --from=build /app/build/libs/*.jar db-app.jar

RUN apt-get update && apt-get install -y netcat

COPY wait.sh /wait.sh
RUN chmod +x /wait.sh
Eureka Server
This server is used service discovery and service registration purpose. You need to use @EnableEurekaServer on your main class.
@EnableEurekaServer
@SpringBootApplication
public class EurekaServerApp {

	public static void main(String[] args) {
		SpringApplication.run(EurekaServerApp.class, args);
	}

}
You need to mention the port used for this server in the application.properties file.
spring.application.name=eureka
server.port=8761
eureka.client.registerWithEureka=false
eureka.client.fetchRegistry=falseeureka.client.register-with-eureka=false: if you make this property true then while the server starts the inbuilt client will try to register itself with the Eureka server.
eureka.client.fetch-registry=false: if you make this property true then the inbuilt client will try to fetch the Eureka registry, which is not yet available. As a result, you would get TransportException.
Database Script
I have created an SQL file called flag.sql and put it under db directory. This will be used to create database and table in MySQL server.
CREATE DATABASE IF NOT EXISTS `roytuts`;
USE `roytuts`;

CREATE TABLE IF NOT EXISTS `flag` (
  `flag_id` int unsigned NOT NULL AUTO_INCREMENT,
  `flag_val` varchar(30) NOT NULL,
  PRIMARY KEY (`flag_id`)
) ENGINE=InnoDB AUTO_INCREMENT=2 DEFAULT CHARSET=utf8mb4 COLLATE=utf8mb4_0900_ai_ci;

INSERT INTO `flag` (`flag_id`, `flag_val`) VALUES
	(1, 'true');
Docker Compose
I already explained why do you need docker compose. So here I am going to show you the whole content for docker-compose.yml/yaml file.
I have used depend-on to arrange the services in order but it does not guarantee that the services kept in order will be executing first and here the situation where you need to control the execution of your services using shell scripts.
version: "3" #optional for docker version 2.x.x

services:
  eureka:
    image: eureka-server
    build:
      context: ./spring-boot-eureka
      dockerfile: Dockerfile
    ports:
      - "8761:8761"

  echo:
    image: echo-app
    restart: on-failure
    build:
      context: ./spring-boot-echo-service
      dockerfile: Dockerfile
    depends_on:
      - eureka
    ports:
      - "9000:9000"
    entrypoint: ["./wait.sh"]

  hello:
    image: hello-app
    restart: on-failure
    build:
      context: ./spring-boot-hello-service
      dockerfile: Dockerfile
    depends_on:
      - eureka
    ports:
      - "8000:8000"
    entrypoint: ["./wait.sh"]

  db-svc:
    image: db-app
    restart: on-failure
    build:
      context: ./spring-boot-db-service
      dockerfile: Dockerfile
    depends_on:
      - eureka
      - db
    ports:
      - "7000:7000"
    entrypoint: ["./wait.sh"]

  db:
    image: mysql:8.0.21
    ports:
      - "33000:3306"
    environment:
      MYSQL_ROOT_PASSWORD: root
    volumes:
      - ./db:/docker-entrypoint-initdb.d/:ro
I am not going to explain what all are keywords used in the aove file but you can read Dockerize Flask MySQL App and Dockerize Spring Boot App to understand the file content.
The entrypoint keyword is used to here to execute the shell script file, i.e., wait.sh.
The restart I have used here if app fails to start then only restart the app.
I have mentioned which directory to look for Dockerfile in each app for building the image.
Testing the Spring Boot Microservices App
Well, I am finished with my coding and the required docker configurations. Let’s test the microservices apps.
Execute the command $ docker-compose up to bring up all services from your root folder of the project or where you have kept your docker-compose.yml file. Wait for few moments, the docker will pull the required images and build the apps and starts up all apps.
If you think that something went wrong in your apps then you can remove all images using the command $ docker-compose down --rmi all for Docker 1.x.x and $ docker compose down --rmi all for Docker 2.x.x.
You can also execute command $ docker-compose up --build for Docker 1.x.x and $ docker compose up --build for Docker 2.x.x to re-build your images.
When your apps are up and running you can use curl or links command to access your API endpoints.
If links is not installed on your system you can do so by using the command $ sudo yum install links.
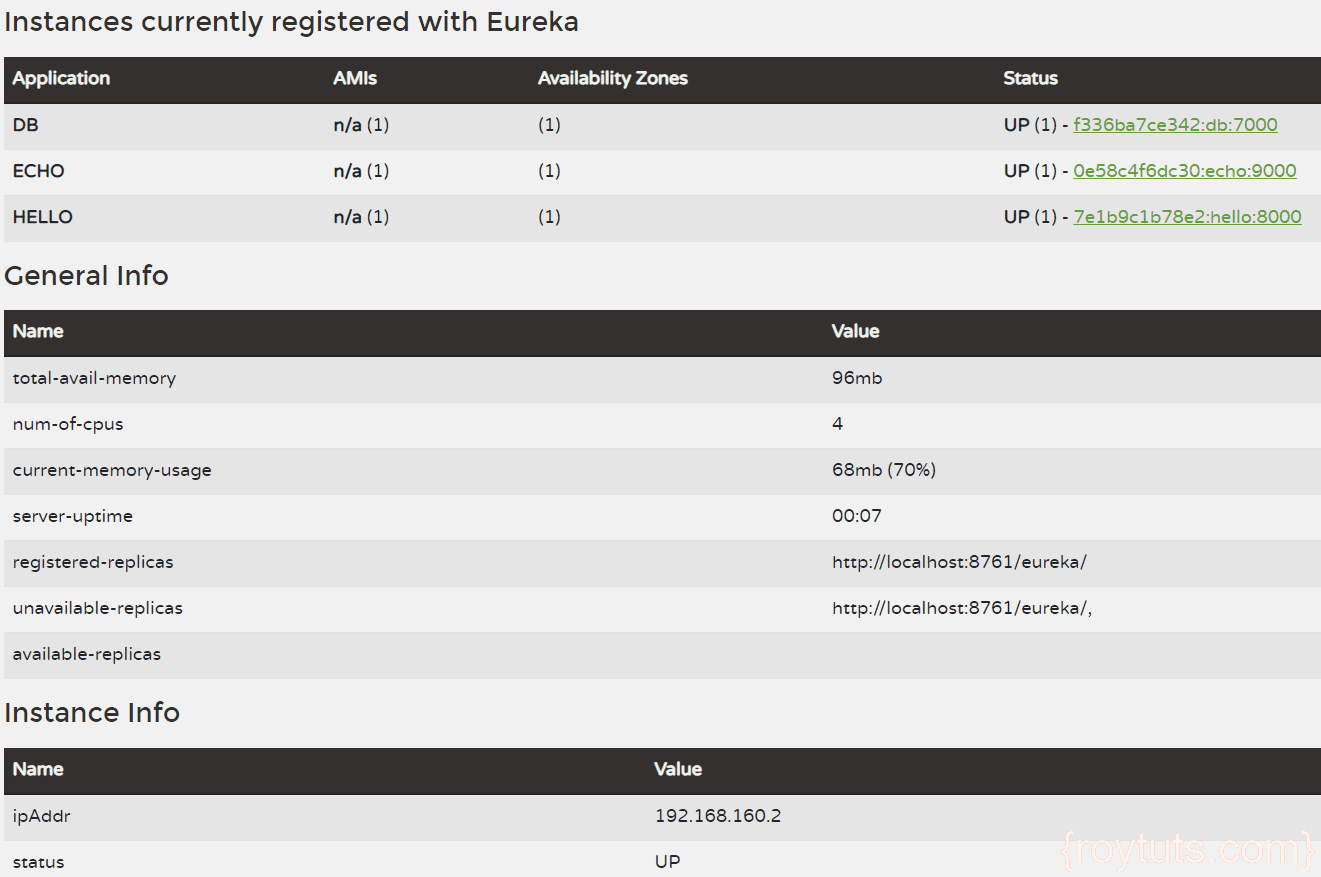
You can check all your service instances in the eureka server endpoint by executing command $ links http://localhost:8761. Notice here I am using localhost with port 8761 because I have already published this port outside container using ports tag in the docker-compose.yml file.
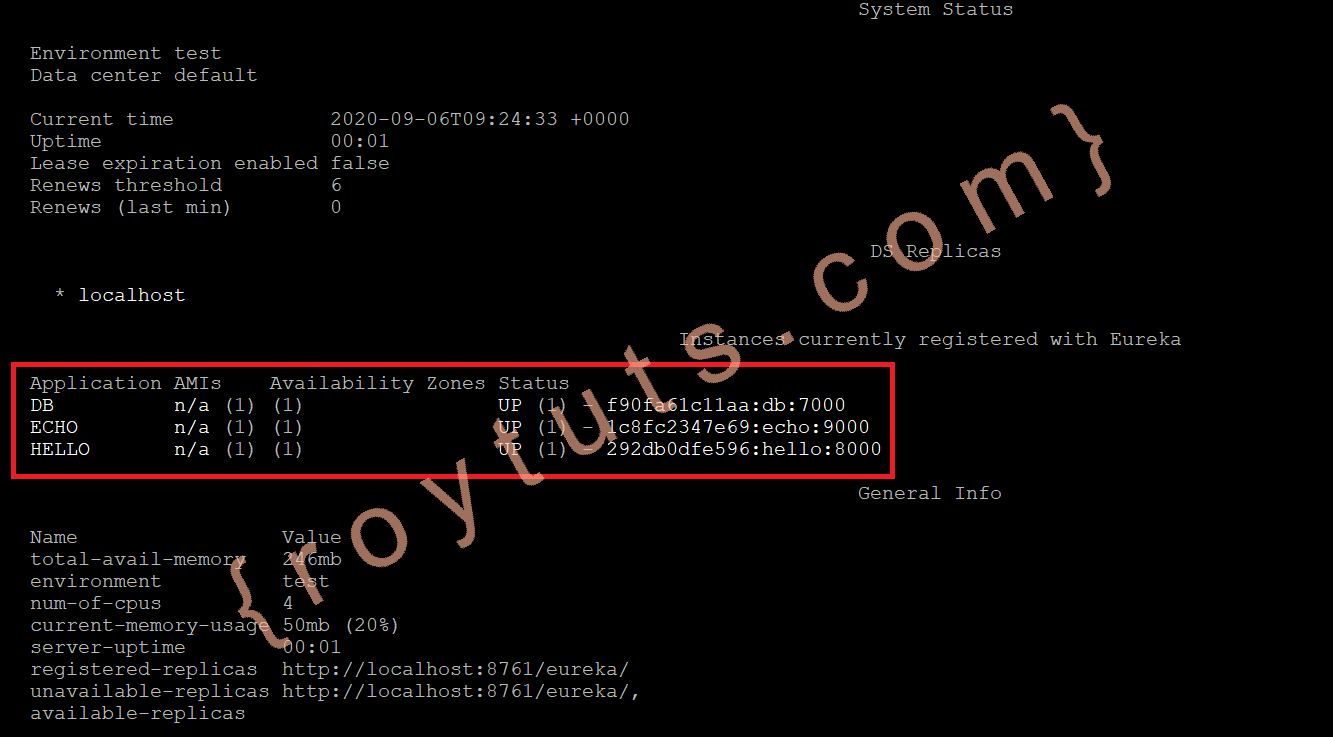
In the browser you can access by your server’s IP address: http://<server ip address>:8761.
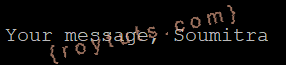
To check the echo service endpoint, use command $ links http://localhost:9000/echo/Soumitra, you will see output similar to the below image:
Or using the server’s IP address you will see the following page:

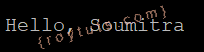
To check the hello service endpoint, use command $ links http://localhost:8000/hello/Soumitra, you will see output similar to the below image:
Or using server’s IP address you will see the following page:

To check the hello service endpoint, use command $ links http://localhost:7000/flag/1, you will see output similar to the below image:

Or using server’s IP address you will see the following page:

You can also check using the IP address of your VPS server instead of localhost. For example if your VPS server’s IP address is 342.123.542.33 then you can hit the URL http://342.123.542.33:8000/hello/Soumitra in the browser to get the same output and it applies for all the above URLs having localhost.

You can also access your MySQL server which is running inside the docker container using the following command:
$ mysql --host=127.0.0.1 --port=33000 -u root -pWhen it prompts for password, enter your password to get the MySQL client terminal. The port which you see here 33000 is the external port but the port 3306 is used inside the container.
Why I am using different port because 3306 port is already used by MySQL server which is accessible publicly and will be a conflict with the container’s port if I use the same port outside the container.