When creating a REST API, good documentation is instrumental.
But developers do not have any option using JSR-339 to generate any documentation on all these APIs so other developers could quickly understand how to use them. For sure, it would be just awesome to generate verbose and easy to follow documentation from source code, and but the help is coming in a form of Swagger.
Essentially, Swagger does a simple but very powerful thing: with a bit of additional annotations it generates the REST API descriptions such as HTTP methods, path / query / form parameters, responses, HTTP error codes etc) and even provides a simple web UI to play with REST calls to your APIs.
You may also like to explore Spring Boot REST API Documentation with Swagger 2 and Documenting REST API using Swagger
What is Swagger?
The Swagger specification is a powerful definition format to describe RESTful APIs. The Swagger specification creates a RESTful interface for easily developing and consuming an API by effectively mapping all the resources and operations associated with it. It’s easy-to-learn, language agnostic, and both human and machine readable.
Swagger is a powerful open source framework backed by a large ecosystem of tools that helps you design, build, document, and consume your RESTful APIs.
Swagger supports seamless integration with JAX-RS services, with just couple of additional annotations required on top of existing ones.
Please find below steps to implement the example
1. Add maven dependency to pom.xml file
<!-- swagger -->
<dependency>
	<groupId>io.springfox</groupId>
	<artifactId>springfox-swagger2</artifactId>
	<version>2.6.1</version>
</dependency>
<!-- swagger ui -->
<dependency>
	<groupId>io.springfox</groupId>
	<artifactId>springfox-swagger-ui</artifactId>
	<version>2.6.1</version>
</dependency>
We need the springfox implementation of swagger specification as shown in the above pom.xml file. We need additional springfox-swagger-ui dependency in order to user the Swagger UI.
Now you can test REST APIs in your browser by visiting <protocol>://<IP or hostname>:<port>/<context path>/swagger-ui.html
2. Web MVC and Swagger configuration using Java
package com.roytuts.spring.mvc.config;
import java.util.Arrays;
import java.util.HashSet;
import java.util.List;
import org.springframework.context.annotation.Bean;
import org.springframework.context.annotation.ComponentScan;
import org.springframework.context.annotation.Configuration;
import org.springframework.http.converter.HttpMessageConverter;
import org.springframework.http.converter.json.MappingJackson2HttpMessageConverter;
import org.springframework.web.servlet.config.annotation.EnableWebMvc;
import org.springframework.web.servlet.config.annotation.ResourceHandlerRegistry;
import org.springframework.web.servlet.config.annotation.WebMvcConfigurerAdapter;
import com.fasterxml.jackson.databind.DeserializationFeature;
import com.fasterxml.jackson.databind.ObjectMapper;
import springfox.documentation.builders.ApiInfoBuilder;
import springfox.documentation.builders.PathSelectors;
import springfox.documentation.builders.RequestHandlerSelectors;
import springfox.documentation.service.ApiInfo;
import springfox.documentation.spi.DocumentationType;
import springfox.documentation.spring.web.plugins.Docket;
import springfox.documentation.swagger2.annotations.EnableSwagger2;
@EnableWebMvc
@Configuration
@EnableSwagger2
@ComponentScan(basePackages = "com.roytuts.spring.*")
public class WebMvcConfig extends WebMvcConfigurerAdapter {
	@Override
	public void extendMessageConverters(List<HttpMessageConverter<?>> converters) {
		converters.add(mappingJackson2HttpMessageConverter());
	}
	@Bean
	public MappingJackson2HttpMessageConverter mappingJackson2HttpMessageConverter() {
		MappingJackson2HttpMessageConverter converter = new MappingJackson2HttpMessageConverter();
		converter.setObjectMapper(
				new ObjectMapper().configure(DeserializationFeature.FAIL_ON_UNKNOWN_PROPERTIES, false));
		return converter;
	}
	@Bean
	public Docket docket() {
		Docket docket = new Docket(DocumentationType.SWAGGER_2);
		docket.protocols(new HashSet<String>(Arrays.asList("http")));
		docket.apiInfo(apiInfo()).select()
				.apis(RequestHandlerSelectors.basePackage("com.roytuts.spring.controllers.rest"))
				.paths(PathSelectors.any()).build();
		return docket;
	}
	@Override
	public void addResourceHandlers(ResourceHandlerRegistry registry) {
		registry.addResourceHandler("swagger-ui.html").addResourceLocations("classpath:/META-INF/resources/");
		registry.addResourceHandler("/webjars/**").addResourceLocations("classpath:/META-INF/resources/webjars/");
	}
	private ApiInfo apiInfo() {
		return new ApiInfoBuilder().title("Sample RESTful API")
				.description("Browse and interact with RESTful API dynamically").build();
	}
}
The method extendMessageConverters() is a hook for extending or modifying the list of converters after it has been configured. For example, this may be useful to allow default converters to be registered and then insert a custom converter through this method.
The bean mappingJackson2HttpMessageConverter() is used to read and write JSON in the response output.
Docket bean is mainly the configuration of Swagger. Swagger 2 is enabled through the @EnableSwagger2 annotation above the class.
After the Docket bean is defined, the protocol is defined and API info is built through ApiInfoBuilder instance, which provides a way to control the endpoints exposed by Swagger.
Predicates for selection of RequestHandlers can be configured with the help of RequestHandlerSelectors and PathSelectors. Using any() for PathSelectors will make documentation for entire API available through Swagger.
Swagger UI adds a set of resources which must be configured by overriding addResourceHandlers() as part of a class that extends WebMvcConfigurerAdapter.
3. Now create below class that is equivalent to deployment descriptor
package com.roytuts.spring.mvc.config;
import org.springframework.web.servlet.support.AbstractAnnotationConfigDispatcherServletInitializer;
public class MvcWebApplicationInitializer extends AbstractAnnotationConfigDispatcherServletInitializer {
	@Override
	protected Class<?>[] getRootConfigClasses() {
		return new Class[] { WebMvcConfig.class };
	}
	@Override
	protected Class<?>[] getServletConfigClasses() {
		return null;
	}
	@Override
	protected String[] getServletMappings() {
		return new String[] { "/" };
	}
}
MVC and Swagger configurations are registered through the above class. Also Dispatcher Servlet mapping has been defined in the getServletMappings() method.
4. Now create below spring REStController class
package com.roytuts.spring.controllers.rest;
import org.springframework.web.bind.annotation.RequestMapping;
import org.springframework.web.bind.annotation.RequestMethod;
import org.springframework.web.bind.annotation.RestController;
import io.swagger.annotations.Api;
import io.swagger.annotations.ApiOperation;
@RestController
@RequestMapping("/")
@Api(tags = "Hello World API", value = "This Service return Hello World")
public class SpringRestController {
	@RequestMapping(value = "/", method = RequestMethod.GET)
	@ApiOperation(value = "Returns Hello World", notes = "Method to return Hello World.")
	public String getHelloWorld() {
		return "Hello, World!";
	}
}
The above class has been annotated with spring RestController to represent REST services as well as swagger annotations(@Api*) to be processed by swagger API to put every details into the API documentation.
5. Now deploy the application into Tomcat 8 server and hit the below URL in order to browse the REST service through Swagger UI.
http://localhost:8080/spring-swagger/swagger-ui.html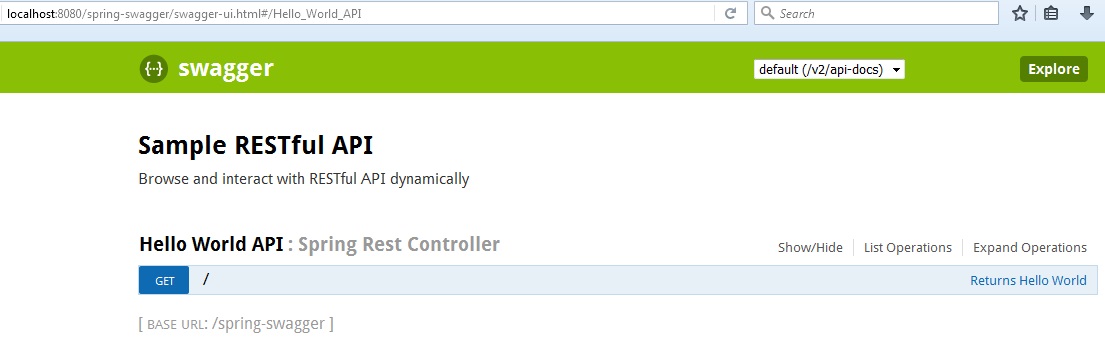
Now you can test the REST service and look for the output.
Thanks for reading.