Download File – Spring Boot REST API
In this post I will show you how to download file using Angular framework and Spring Boot. There are situations when you need to download file from server or you need to generate report from database and download it. This example may help you in such situation.
I will build the Spring Boot application using both maven and gradle build tools. Here I will fetch records from database and download in a JSON data format. As a server side technology I will use Spring Boot and in client side I will use Angular framework.

Related Posts:
Prerequisites
Java at least 1.8+ (11-16), Gradle 6.5.1/6.7.1, Maven 3.6.3/3.8.2/3.8.5, Spring Boot 2.3.2/2.5.6/2.7.6, H2 Database 1.4.200, JAXB-API if you are using JDK 9 or above
Download file from server using Angular
Project Setup
Create gradle or maven based project in your favorite tool or IDE and the name of the project is spring-rest-h2-download-file.
build.gradle
Update the default generated content in build script. You need to include the required dependencies for Spring Boot, JPA and H2 in-memory database. I am using in-memory database H2 to do a quick PoC (Proof of Concept). You can use any database as per your project requirements.
buildscript {
	ext {
		springBootVersion = '2.3.2.RELEASE' to '2.4.2'
	}

    repositories {
    	mavenCentral()
    }

    dependencies {
    	classpath("org.springframework.boot:spring-boot-gradle-plugin:${springBootVersion}")
    }
}

plugins {
    id 'java-library'
    id 'org.springframework.boot' version "${springBootVersion}"
}

sourceCompatibility = 12
targetCompatibility = 12

repositories {
    mavenCentral()
}

dependencies {
	implementation "org.springframework.boot:spring-boot-starter-web:${springBootVersion}"
	implementation "org.springframework.boot:spring-boot-starter-data-jpa:${springBootVersion}"
	runtime("com.h2database:h2:1.4.200")

	//required for jdk 9 or above
	runtimeOnly('javax.xml.bind:jaxb-api:2.4.0-b180830.0359')
}
pom.xml
If you are using maven based build tool for your application then you can use below pom.xml.
<?xml version="1.0" encoding="UTF-8"?>

<project xmlns="http://maven.apache.org/POM/4.0.0"
	xmlns:xsi="http://www.w3.org/2001/XMLSchema-instance"
	xsi:schemaLocation="http://maven.apache.org/POM/4.0.0 http://maven.apache.org/xsd/maven-4.0.0.xsd">
	<modelVersion>4.0.0</modelVersion>

	<groupId>com.roytuts</groupId>
	<artifactId>spring-rest-h2-download-file</artifactId>
	<version>0.0.1-SNAPSHOT</version>

	<properties>
		<project.build.sourceEncoding>UTF-8</project.build.sourceEncoding>
		<maven.compiler.source>12</maven.compiler.source>
		<maven.compiler.target>12</maven.compiler.target>
	</properties>

	<parent>
		<groupId>org.springframework.boot</groupId>
		<artifactId>spring-boot-starter-parent</artifactId>
		<version>2.3.2.RELEASE to 2.7.6</version>
	</parent>

	<dependencies>
		<dependency>
			<groupId>org.springframework.boot</groupId>
			<artifactId>spring-boot-starter-web</artifactId>
		</dependency>

		<dependency>
			<groupId>org.springframework.boot</groupId>
			<artifactId>spring-boot-starter-data-jpa</artifactId>
		</dependency>

		<dependency>
			<groupId>com.h2database</groupId>
			<artifactId>h2</artifactId>
			<scope>runtime</scope>
		</dependency>

		<!--required only if jdk 9 or higher version is used -->
		<dependency>
			<groupId>javax.xml.bind</groupId>
			<artifactId>jaxb-api</artifactId>
			<scope>runtime</scope>
		</dependency>
	</dependencies>

	<build>
		<plugins>
			<plugin>
				<groupId>org.springframework.boot</groupId>
				<artifactId>spring-boot-maven-plugin</artifactId>
			</plugin>
		</plugins>
	</build>
</project>
Application Properties File
Create a property file called application.yml under classpath directory src/main/resources with the below content to enable h2 console and log the SQL statement used for database operations in pretty format in the console.
spring:
   jpa:
      show-sql: true
      hibernate:
         ddl-auto: none
   h2:
      console:
         enabled: true
Or if you want to use application.properties file then you can use the following content:
#spring.datasource.url=jdbc:h2:mem:testdb;DB_CLOSE_DELAY=-1
#spring.datasource.driverClassName=org.h2.Driver
#spring.datasource.username=sa
#spring.datasource.password=

spring.jpa.show-sql=true
spring.h2.console.enabled=true
spring.jpa.hibernate.ddl-auto=none

#spring.datasource.schema=classpath:schema.sql
#spring.datasource.data=classpath:data.sql
JPA Entity Class
In this application there is a need for an entity class to map Java attribute to database table’s column.
I will not create any SQL script for creating table in h2 database but Spring Boot will automatically create the table for below entity class. In this case spring.jpa.hibernate.ddl-auto is not needed in the application properties file.
If Spring Boot does not create the table automatically from the entity class then you need to create schema.sql file with table creation script. And the property
spring.jpa.hibernate.ddl-automust be set tononein application properties file.
If you do not specify the column name for the corresponding Java attribute or field then the same attribute name will be used to create column in the database table.
You don’t need to define any datasource when you are using in-memory embedded database h2.
@Entity
public class Employee {

	@Id
	@GeneratedValue(strategy = GenerationType.IDENTITY)
	private Integer id;

	private String name;

	@Column(name = "email_address")
	private String email;

	public Employee() {
	}

	public Employee(Integer id, String name, String email) {
		this.id = id;
		this.name = name;
		this.email = email;
	}

	public Integer getId() {
		return id;
	}

	public void setId(Integer id) {
		this.id = id;
	}

	public String getName() {
		return name;
	}

	public void setName(String name) {
		this.name = name;
	}

	public String getEmail() {
		return email;
	}

	public void setEmail(String email) {
		this.email = email;
	}

}
Table Creation Script
The below table creation script src/main/resources/schema.sql is required if table is not created from the entity class.
drop table if exists employee;

create table employee (
  id INTEGER generated by default as identity (start with 1) primary key,
  name varchar(25) not null,
  email_address varchar(50) not null
);
Sample Data into Table
Spring Boot will create table from entity class but you need to insert some data into the table.
So I will create a SQL script called data.sql under classpath directory src/main/resources as shown below:
insert into employee(name,email_address)
values('Soumitra','soumitra@email.com');
insert into employee(name,email_address)
values('Liton','liton@email.com');
insert into employee(name,email_address)
values('Suman','suman@email.com');
insert into employee(name,email_address)
values('Debabrata','debabrata@email.com');
Spring JPA Repository
Spring has excellent API called Spring Data JPA Repository that gives us many benefits out of the box. You just need to write methods by extending JpaRepository interface for performing basic CRUD operations. Then Spring will generate appropriate queries for your methods.
public interface EmployeeRepository extends JpaRepository<Employee, Integer> {

}
Create VO Class
It’s a good idea to create DTO or VO class as a response object rather than an entity class.
public class EmployeeVo {

	private Integer id;
	private String name;
	private String email;

	public Integer getId() {
		return id;
	}

	public void setId(Integer id) {
		this.id = id;
	}

	public String getName() {
		return name;
	}

	public void setName(String name) {
		this.name = name;
	}

	public String getEmail() {
		return email;
	}

	public void setEmail(String email) {
		this.email = email;
	}

}
Spring Service Class
Service class is always used to process your business for the application.
@Service
public class EmployeeService {

	@Autowired
	private EmployeeRepository employeeRepository;

	public List<EmployeeVo> getEmployeeList() {

		List<Employee> list = employeeRepository.findAll();
		return list.stream().map(emp -> {
			EmployeeVo vo = new EmployeeVo();
			vo.setId(emp.getId());
			vo.setName(emp.getName());
			vo.setEmail(emp.getEmail());
			return vo;
		}).collect(Collectors.toList());

	}

}
Spring REST Controller
The Spring REST Controller class is responsible for handling request/response for the end users or clients.
Here in the below Spring REST controller class, I fetch the data from database and convert into JSON data to send to the client as byte array.
I allow request and response for the origin http://localhost:4200 using @CrossOrigin(origins = "http://localhost:4200"). If you do not allow cross-origin request/response for the mentioned URL then you won’t be able to download file. You can also put * to allow all origins but it is not a good practice for security reasons.
@RestController
@CrossOrigin(origins = "http://localhost:4200")
public class EmployeeRestController {

	@Autowired
	private EmployeeService employeeService;

	@GetMapping("/employees/download")
	public ResponseEntity<byte[]> downloadFile() throws Exception {

		List<EmployeeVo> employees = employeeService.getEmployeeList();
		ObjectMapper objectMapper = new ObjectMapper();
		String json = objectMapper.writeValueAsString(employees);
		byte[] isr = json.getBytes();

		String fileName = "employees.json";

		HttpHeaders respHeaders = new HttpHeaders();
		respHeaders.setContentLength(isr.length);
		respHeaders.setContentType(new MediaType("text", "json"));
		respHeaders.setCacheControl("must-revalidate, post-check=0, pre-check=0");
		respHeaders.set(HttpHeaders.CONTENT_DISPOSITION, "attachment; filename=" + fileName);

		return new ResponseEntity<byte[]>(isr, respHeaders, HttpStatus.OK);
	}

}
Spring Boot Main Class
Create below main class to deploy the application into embedded Tomcat server.
You need to let Spring container know where are our entity class and repository interface. You can also use a separate configuration class to enable such things.
@SpringBootApplication
@EntityScan("com.roytuts.spring.rest.download.file.entity")
@EnableJpaRepositories("com.roytuts.spring.rest.download.file.repository")
public class SpringRestH2FileDownloadApp {

	public static void main(String[] args) {
		SpringApplication.run(SpringRestH2FileDownloadApp.class, args);
	}

}
Testing File Download Application
Run the main class to deploy the application into Tomcat server.
If you hit the URL http://localhost:8080/employees/download in the browser then you will get the file for save as option. Even you can test the same using Postman or any other REST client.
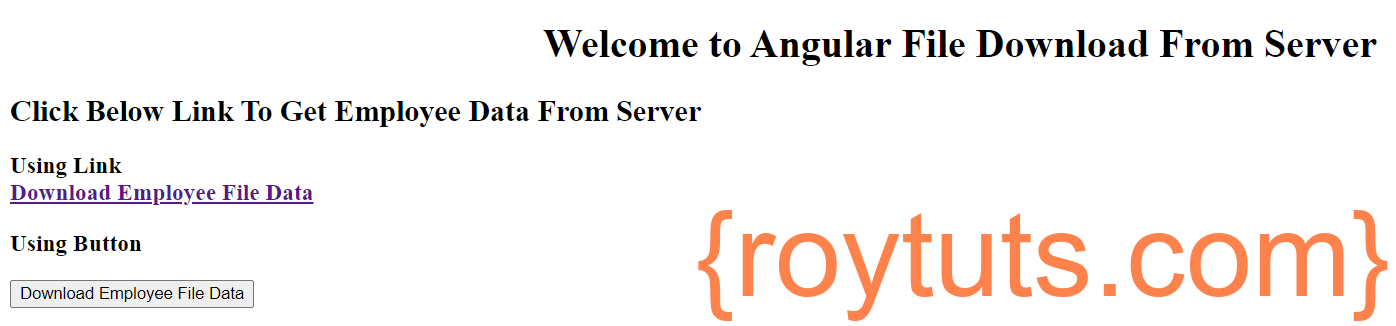
When you run the Angular application to open in browser.
Once your application opens at URL http://localhost:4200 in the browser and the page may look similar to the below image:
When you click on link or button for downloading file you will see below page with file save option:

That’s all about how to download file using Spring REST and Spring Data JPA APIs from H2 database.