Introduction
In this post we are going to discuss how to create plugin in WordPress CMS (Content Management System). Creating custom WordPress plugin is simple and you just need to follow some steps to make it available in your WordPress site. We will create a simple email subscription form through which users will be able to subscribe to your recent posts. We will also discuss why do you need to create your own plugin in the next section.
Why do you need plugins?
WordPress plugin allows you to modify, customize and enhance your WordPress site without changing the core program code of WordPress.
Therefore you are adding additional functionalities to your WordPress site by writing a program or one or more set of functions in PHP language.
You can integrate your custom code written for plugin with the site using access points and methods provided by WordPress.
Why do you need to write a plugin even it exists already?
You will find that there are already number of ready made plugins available in the market. These plugins are available in free or in paid versions. Some of them are completely free, some of them are with limited features in free versions and rest of the features are available in paid versions. Therefore everyone may not be able to afford to buy the paid version of the plugin.
Therefore if you can create your own plugin then it would be feasible to create your own plugin.
But if you don’t have sufficient time to create your own plugin then you have to choose either free version with limited features or paid version with required features.
Creating Plugin
Now we will see how to create a simple plugin in WordPress CMS (Content Management System).
In subsequent sections we will see what name you should consider for your plugin and where to put your plugin files.
Plugin Name
When you are thinking of creating a plugin you should think about what your plugin will do, then choose a unique meaningful name for your plugin so that people can understand what the plugin is about when they first look at it. The name can be made up of multiple words.
Let’s say we are going to create a simple email subscription plugin here. So the name of the plugin I will will prefer is roytuts-email-subscription.
The name of the plugin indicates the name of the plugin folder. So you will ideally create a plugin folder called roytuts-email-subscription.
Plugin Files and Location
The next step is to create a PHP file inside the plugin folder roytuts-email-subscription.
Ideally (not necessarily) you may put plugin’s main PHP file’s name as same as plugin’s folder name. So you need to create a PHP file called roytuts-email-subscription.php under roytuts-email-subscription folder.
Your plugin must contain at least one PHP file. It may also contain JavaScript files, CSS files, images and language files.
You must upload your plugin folder roytuts-email-subscription under wp-content/plugins folder in the server in order to activate it.
Remember your plugin name should not match with the existing plugin.
You need to block the direct access of your plugin file. So add the below line in your plugin’g PHP file.
defined( 'ABSPATH' ) or die( 'No script kiddies please!' );Alternatively you can check if a function such as add_action exists and it will also block direct access to your PHP file.
I would not go too much details here on creating a WordPress plugin but you can always find a good documentation on the developer guide.
File Headers
The plugin’s main PHP file should include header information what tells WordPress that a file is a plugin and provides information about the plugin.
At a minimum, a header comment must contain the Plugin Name:
<?php
/**
 * Plugin Name: Roytuts Email Subscription
 */
For our plugin we have below header information in the roytuts-email-subscription.php file.
<?php
/**
 * Plugin Name: Roytuts Email Subscription
 * Description: This plugin allows users subscribe to recent posts
 * Version: 1.0.0
 * Author: Soumitra Roy Sarkar
 * Author URL: https://roytuts.com
 */
For more information on header information you can find here.
Now at this point your plugin has been created and it does not do anything.
The goal of this post is to illustrate how simple it is to get started creating WordPress plugin.
Making plugin do something
As the plugin name suggests that it’s an email subscription plugin, so we will put some HTML tags to build the subscription form.
Using this subscription form users will be able to subscribe to your new posts.
We will create the below function in plugin’s PHP file roytuts-email-subscription.php to build the form:
function roytuts_email_subscription_display_form() {
   return '<div id="roytuts-subscription"><h3>Subscribe to Recent Posts:</h3>
		<p><input type="text" id="roytuts_contact_email" name="roytuts-email" placeholder="Email Address"></input></p>
		<p><input type="button" id="roytuts_submit" value="Subscribe Now!" /></p>
	</div>';
}
The above code snippets are simple. It design an input field for email address and a button to subscribe.
We will create now short code which you can use on a page or text widget so that your subscription form will be displayed.
To display subscription form you must activate the plugin from admin dashboard and use the short code.
We need similar kind of short code as shown below:
//add shortcode
add_shortcode('roytuts-email-subscription-display', 'roytuts_email_subscription_display_form');
Now putting the short code roytuts-email-subscription-display on a page or text widget will display your subscription form.
The above plugin will not really subscribe the users but it will just display the subscription form.
Uploading Plugin
You are done with the coding, now it’s time to test the plugin whether it works or not.
First upload your plugin into wp-content/plugins folder in the server.
Activating Plugin
Now if you go to the admin dashboard and check for the new plugin by navigating from the menu Plugins -> Installed Plugins, you will see similar to the below image:

Now click on Activate to activate the plugin.
Displaying Subscription Form
Now it’s time to display subscription form on your web page or widget.
If you want to display on a single post or page then you need to edit your child theme’s template file and put the below short code after the end of the post or wherever you want to display.
<?php echo do_shortcode('[short code name]'); ?>In the above replace the short code name by roytuts-email-subscription-display.
If you want to display on widget then make sure you select text widget and put the below short code:
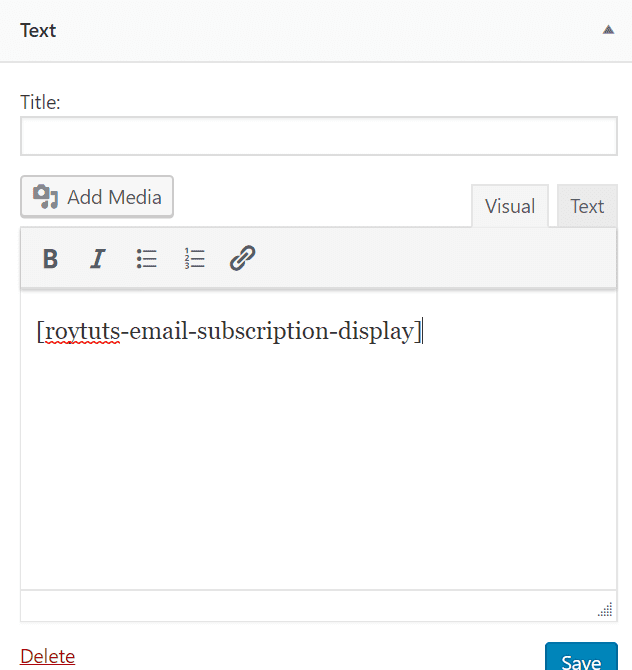
Click on Save button to save.
Now check your site, you will see subscription form is displayed.

The above subscription form will not accept subscription because it does not have such functionality.
So hope you got an idea how to create a plugin and activate the plugin and display the plugin on a page or widget.
What’s next? We will create a table for storing user email address when a user subscribes.
Source Code
Thanks for reading.