Introduction
I will show here how to use checkstyle plugin in gradle based Java project. Checkstyle is a static code quality tool used to find Fan-out complexity of a class, complexity of method, utility class, bugs due to not following the coding standards. So you can remove the complexity from your Java source code and make the code more readable and maintainable for future.
You may also like to read Code quality using SonarQube or Jacoco in Gradle Projects.
What is checkstyle?
Checkstyle is a static code analysis tool used in software development for checking if Java source code complies with coding rules.
The programming style adopted by a software development project can help to comply with good programming practices which improve the code quality, readability, re-usability, and reduce the cost of development.
The performed checks mainly limit themselves to the presentation and don’t analyze content, and do not confirm the correctness or completeness of the program.
In practice, it can be tedious to comply with all the style constraints, some of which could possibly harm the programming stages’ dynamic; so, it may be useful to determine which level of check is needed for a certain type of program.
Checkstyle defines a set of available modules, each of which provides rules checking with a configurable level of strictness (mandatory, optional…). Each rule can raise notifications, warnings, and errors.
For example, checkstyle can examine:
- Javadoc comments for classes, attributes and methods;
- Naming conventions of attributes and methods;
- Limit of the number of function parameters, line lengths;
- Presence of mandatory headers;
- The use of packets imports, of classes, of scope modifiers and of instructions blocks;
- The spaces between some characters;
- The good practices of class construction;
- Multiple complexity measurements, among which expressions.
What is checkstyle plugin?
The Checkstyle plugin performs quality checks on your project’s Java source files using Checkstyle and generates reports from these checks. Here we will see how to use checkstyle plugin in gradle based project.
Applying Checkstyle Plugin
The Checkstyle plugin adds the following tasks to the project.
To use checkstyle in gradle based Java project you need to use the checkstyle plugin in the following way:
plugins {
    id 'checkstyle'
}
Or
apply plugin: 'checkstyle'For checking such rules you first define such rules generally in checkstyle.xml file and if you want to suppress or avoid any defined rule in checkstyle.xml file as an exception for any class or module then you can define suppression rules in checkstyle-suppressions.xml file and include this file into checkstyle.xml file.
By default, the Checkstyle plugin expects configuration files to be placed in the root project, but this can be changed and you need to configure in the build.gradle script.
The default location of checkstyle.xml file is <root project directory>/config/checkstyle/checkstyle.xml. If you have checkstyle-suppressions.xml or suppression.xml file then you can also put this file under config/checkstyle directory.
If you do not want to use the default location of the checkstyle configuration file then you can create checkstyle configuration directory and put your checkstyle configuration files.
Suppose you have created directories quality/checkstyle under project’s root directory you have put your checkstyle.xml and suppressions.xml files. In this case you need the following configurations in your build.gradle script:
def configDir = "${project.rootDir}/quality"

checkstyle {
    toolVersion '8.36.1'
    configFile file("$configDir/checkstyle/checkstyle.xml")
    configProperties.checkstyleSuppressionsPath = file("$configDir/checkstyle/suppressions.xml").absolutePath
}

checkstyleMain {
    source ='src/main/java'
}

checkstyleTest {
    source ='src/test/java'
}
In the above configurations I assume that you have not included suppressions.xml file into checkstyle.xml file. If you include suppressions.xml file into checkstyle.xml file then you don’t need to configure it separately in build.gradle script. Please find in below section how to include suppressions.xml or checkstyle-suppressions.xml file into checkstyle.xml file.
Including other configuration file into checkstyle.xml file
I will use the Sun checkstyle file in this example and can be downloaded later from the source code section. Add the following XML tag at the end of the content in checkstyle.xml file but before the last line (</module>), where suppressions.xml file is your suppression configuration file:
<module name="SuppressionFilter">
	<property name="file" value="quality/checkstyle/suppressions.xml" />
</module>
or if you have configuration files into default location then you can use below:
<module name="SuppressionFilter">
	<property name="file" value="${config_loc}/suppressions.xml" />
</module>
Where does error reports get generated at?
The error report gets generated at the location <roor project’s directory>/build/reports/checkstyle and you will find HTML and XML files generated where you will find all errors are listed. You can check one by one and solve those issues.
Let’s move on to the example…
Project Setup
As a prerequisite you have to first setup the project environment so that you would be able to write the required code for using checkstyle in your application. The build.gradle script is given with the required configurations as shown below. I have specified the JDK version I will be using for this application.
Notice I have used checkstyle plugin and I am using the checkstyle file’s default location, so I don’t need to configure the checkstyle location in build file explicitly.
plugins {
    id 'java-library'
    id 'checkstyle'
}

sourceCompatibility = 12
targetCompatibility = 12

repositories {
    jcenter()
}

dependencies {
}
Now you should be able to build the project.
Recommended reading: Utility classes should not have a public or default constructor
Java Class
I have finished configuring checkstyle plugin and creating gradle based Java project. Now I need to create a Java class in order to check how checkstyle rules are applied to the Java class and what rules are getting violated and accordingly I need to fix those violation errors.
package com.roytuts.java.project.checkstyle;

public class CheckStyleApp {

    public static void main(String[] args) {
        System.out.println("Hello, CheckStyle");
    }

}
Testing the Application
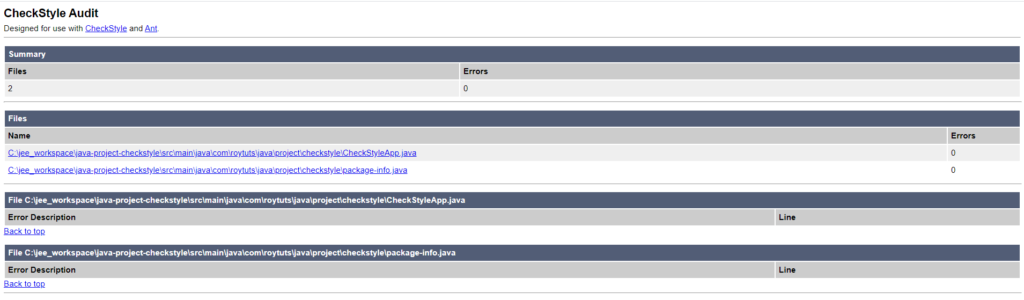
Now navigate to the project root directory using cmd prompt and execute the command gradle clean build or gradlew clean build. You should see the some errors in the report.
You can open the error report file (java-project-checkstyle/build/reports/checkstyle/main.html) and check what are the errors you have encountered in your Java file. When you open the report file main.html then you see following errors:
- Missing package-info.java file.
- Utility classes should not have a public or default constructor.
- File contains tab characters (this is the first instance).
- Missing a Javadoc comment.
- Parameter args should be final.
Now it’s time to fix the issues.
First, add the documentation above the class as shown below:
package com.roytuts.java.project.checkstyle;

/**
 *
 * @author Soumitra
 *
 */
public final class CheckStyleApp {
Next add the below package-info.java file in the same package of the project. Make sure you do not create any Java class for this but you should create normal file.
/**
 *
 * @author Soumitra
 *
 */
package com.roytuts.java.project.checkstyle;
Next fix is to make the class final as you are not going to create any instance from it and it will fix the second issue (Utility classes should not have a public or default constructor.). So in the above example I have already made the class final.
Now I have also added JavaDoc but still you will receive this error if you build the app. To completely remove this error you need to add JavaDoc on the main method also.
The complete class with fix is given below:
package com.roytuts.java.project.checkstyle;

/**
 *
 * @author Soumitra
 *
 */
public final class CheckStyleApp {

    private CheckStyleApp() {
    }

    /**
     *
     * @param args
     */
    public static void main(final String[] args) {
        System.out.println("Hello, CheckStyle");
    }

}
So I have added JavaDoc above the main() method and I have also made the main() method parameter final.
The only issue now left is File contains tab characters (this is the first instance). Now you need to go to your IDE and change the style formatter from tab to space. For Eclipse you can do so by visiting the navigation: Preference -> Java -> Code Style -> Formatter. Edit the Active profile. (If you don’t wish to edit the built-in profile, create a new profile). Under “Active profile:” there is a drop down dialogue box .. beside it, click “Edit…” which opens up the edit dialog box. Under the “Indention” tab, you’ll find Tab Policy. Change the Tab Policy from Mixed to Space only & apply the changes.
Now test the application from the cmd prompt by executing the same command gradle clean build. Now you should not see any error in cmd console or in the report file. The report file now looks similar to below:
That’s all. You can use the checkstyle plugin in the same way I have explained above for your any Java based application.
Source Code
Thanks for reading.