This tutorial will show you how we can auto inject value from properties file in Spring. For this tutorial we will create a standalone maven project in Eclipse.
If you already have an idea on how to create a maven project in Eclipse will be great otherwise I will tell you here how to create a maven project in Eclipse.
Prerequisites
The following things are required in order to run the application
Eclipse Helios
JDK 1.6
Have maven installed and configured
Spring dependencies in pom.xml
Now we will see the below steps how to create a maven based spring project in Eclipse
Step 1. Create a standalone maven project in Eclipse
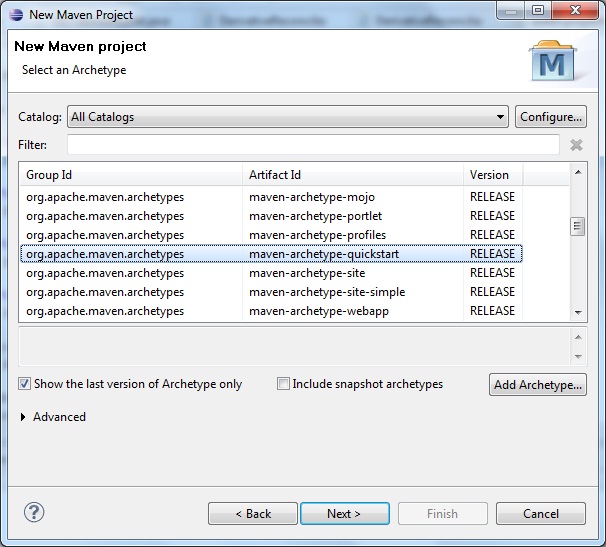
Go to File -> New -> Other. On popup window under Maven select Maven Project. Then click on Next. Select the workspace location – either default or browse the location. Click on Next. Now in next window select the row as highlighted from the below list of archtypes and click on Next button.
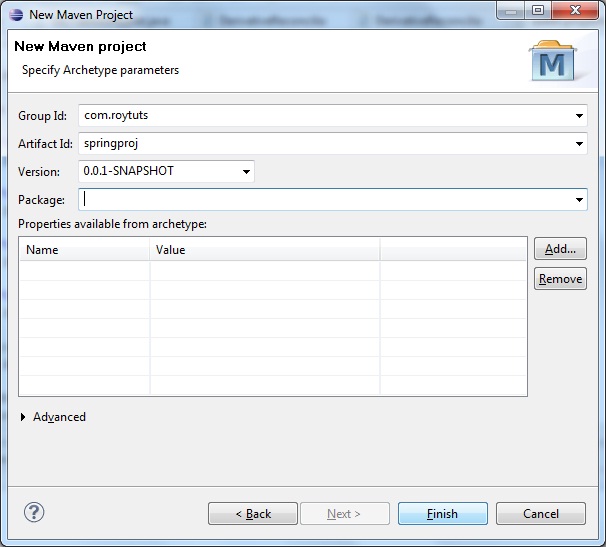
Now enter the required fields (Group Id, Artifact Id) as shown below picture
Step 2. Modify the pom.xml file as shown below.
<project xmlns="http://maven.apache.org/POM/4.0.0" xmlns:xsi="http://www.w3.org/2001/XMLSchema-instance"
	xsi:schemaLocation="http://maven.apache.org/POM/4.0.0 http://maven.apache.org/xsd/maven-4.0.0.xsd">
	<modelVersion>4.0.0</modelVersion>
	<groupId>com.roytuts</groupId>
	<artifactId>springproj</artifactId>
	<version>0.0.1-SNAPSHOT</version>
	<packaging>jar</packaging>
	<name>springproj</name>
	<url>http://maven.apache.org</url>
	<properties>
		<project.build.sourceEncoding>UTF-8</project.build.sourceEncoding>
		<jdk.version>1.6</jdk.version>
		<junit.version>4.11</junit.version>
		<org.springframework.version>3.2.3.RELEASE</org.springframework.version>
	</properties>
	<dependencies>
		<!-- Spring framework -->
		<dependency>
			<groupId>org.springframework</groupId>
			<artifactId>spring-core</artifactId>
			<version>${org.springframework.version}</version>
		</dependency>
		<dependency>
			<groupId>org.springframework</groupId>
			<artifactId>spring-context</artifactId>
			<version>${org.springframework.version}</version>
		</dependency>
		<dependency>
			<groupId>org.springframework</groupId>
			<artifactId>spring-jdbc</artifactId>
			<version>${org.springframework.version}</version>
		</dependency>
		<!-- mysql driver -->
		<dependency>
			<groupId>mysql</groupId>
			<artifactId>mysql-connector-java</artifactId>
			<version>5.1.27</version>
		</dependency>
		<!-- junit -->
		<dependency>
			<groupId>junit</groupId>
			<artifactId>junit</artifactId>
			<version>${junit.version}</version>
			<scope>test</scope>
		</dependency>
	</dependencies>
	<build>
		<plugins>
			<plugin>
				<groupId>org.apache.maven.plugins</groupId>
				<artifactId>maven-compiler-plugin</artifactId>
				<configuration>
					<source>${jdk.version}</source>
					<target>${jdk.version}</target>
				</configuration>
			</plugin>
		</plugins>
	</build>
</project>
Step 3. If you see JRE System Library[J2SE-1.4] then change the version by below process
Do right-click on the project and go to Build -> Configure build path, under Libraries tab click on JRE System Library[J2SE-1.4], click on Edit button and select the appropriate jdk 1.6 from the next window. Click on Finish then Ok.
Step 4. Create src/main/resources folder for putting the resource files.
Do right-click on the project and go New -> Source Folder. Give Folder name: as src/main/resources and click on Finish button.
Step 5. Create a properties file under src/main/resources.
Do right-click on src/main/resources in the project and go New -> file. Give File name: as app.properties and click on Finish button.
#jdbc properties
jdbc.driver=com.mysql.jdbc.Driver
jdbc.url=jdbc:mysql://localhost:3306/dbname
jdbc.username=root
jdbc.password=root
#message
welcome=Welcome to Spring project
msg=Learn how to inject values from properties file
Step 6. Create datasource.xml file under src/main/resources with the below content.
<?xml version="1.0" encoding="UTF-8"?>
<beans xmlns="http://www.springframework.org/schema/beans"
	xmlns:xsi="http://www.w3.org/2001/XMLSchema-instance" xmlns:p="http://www.springframework.org/schema/p"
	xmlns:aop="http://www.springframework.org/schema/aop" xmlns:context="http://www.springframework.org/schema/context"
	xmlns:jee="http://www.springframework.org/schema/jee" xmlns:tx="http://www.springframework.org/schema/tx"
	xmlns:task="http://www.springframework.org/schema/task"
	xsi:schemaLocation="http://www.springframework.org/schema/aop http://www.springframework.org/schema/aop/spring-aop-3.2.xsd http://www.springframework.org/schema/beans http://www.springframework.org/schema/beans/spring-beans-3.2.xsd http://www.springframework.org/schema/context http://www.springframework.org/schema/context/spring-context-3.2.xsd http://www.springframework.org/schema/jee http://www.springframework.org/schema/jee/spring-jee-3.2.xsd http://www.springframework.org/schema/tx http://www.springframework.org/schema/tx/spring-tx-3.2.xsd http://www.springframework.org/schema/task http://www.springframework.org/schema/task/spring-task-3.2.xsd">
	<context:property-placeholder location="app.properties" />
	<bean id="dataSource"
		class="org.springframework.jdbc.datasource.DriverManagerDataSource">
		<property name="driverClassName" value="${jdbc.driver}" />
		<property name="url" value="${jdbc.url}" />
		<property name="username" value="${jdbc.username}" />
		<property name="password" value="${jdbc.password}" />
	</bean>
	<bean id="jdbcTemplate" class="org.springframework.jdbc.core.JdbcTemplate">
		<property name="dataSource" ref="dataSource"></property>
	</bean>
</beans>
Step 7. Create applicationContext.xml file under src/main/resources with the below content.
<?xml version="1.0" encoding="UTF-8"?>
<beans xmlns="http://www.springframework.org/schema/beans"
	xmlns:xsi="http://www.w3.org/2001/XMLSchema-instance" xmlns:p="http://www.springframework.org/schema/p"
	xmlns:aop="http://www.springframework.org/schema/aop" xmlns:context="http://www.springframework.org/schema/context"
	xmlns:jee="http://www.springframework.org/schema/jee" xmlns:tx="http://www.springframework.org/schema/tx"
	xmlns:task="http://www.springframework.org/schema/task"
	xsi:schemaLocation="http://www.springframework.org/schema/aop http://www.springframework.org/schema/aop/spring-aop-3.2.xsd http://www.springframework.org/schema/beans http://www.springframework.org/schema/beans/spring-beans-3.2.xsd http://www.springframework.org/schema/context http://www.springframework.org/schema/context/spring-context-3.2.xsd http://www.springframework.org/schema/jee http://www.springframework.org/schema/jee/spring-jee-3.2.xsd http://www.springframework.org/schema/tx http://www.springframework.org/schema/tx/spring-tx-3.2.xsd http://www.springframework.org/schema/task http://www.springframework.org/schema/task/spring-task-3.2.xsd">
	<!-- import datasource.xml to make it available for use -->
	<import resource="datasource.xml" />
	<!-- get benefits of using annotations -->
	<context:annotation-config></context:annotation-config>
	<!-- Bean -->
	<bean id="injectBean" class="com.roytuts.springproj.InjectBean" />
</beans>
Step 8. Create InjectBean in com.roytuts.springproj package
Note : if you get error then you can change the Compiler compliance level, Generated .class files compatibility, Source compatibility to 1.6
package com.roytuts.springproj;
import org.springframework.beans.factory.annotation.Value;
public class InjectBean {
	@Value("${welcome}")
	private String welcome;
	@Value("${msg}")
	private String msg;
	public void displayPropertiesValue() {
		System.out.println("welcome : " + welcome);
		System.out.println("msg : " + msg);
	}
}
Step 9. Now create a main class which will test the application.
package com.roytuts.springproj;
import org.springframework.context.ApplicationContext;
import org.springframework.context.support.ClassPathXmlApplicationContext;
public class App {
	public static void main(String[] args) {
		ApplicationContext applicationContext = new ClassPathXmlApplicationContext(
				"applicationContext.xml");
		InjectBean injectBean = (InjectBean) applicationContext
				.getBean("injectBean");
		injectBean.displayPropertiesValue();
	}
}
Step 10. Run the App.java. You will get the below output
welcome : Welcome to Spring project
msg : Learn how to inject values from properties file
That’s all. Thank you for reading.