Preview Form
This tutorial shows how you can preview form using jQuery. Sometimes you need to preview form data before you submit the form for further processing. This gives you clear picture of what you have entered into the form and whether you need to rectify any data if you have entered incorrectly. This also saves us from extra server logic processing.
Prerequisites
Knowledge of HTML, CSS and jQuery 3.4.1 – 3.5.1/3.7.1, jQuery UI 1.12.1/1.13.2
Preview HTML Form Data using jQuery
Here I have listed down some basic steps which you need to follow:
Step 1. Create a folder called preview-form anywhere in your computer disk space.
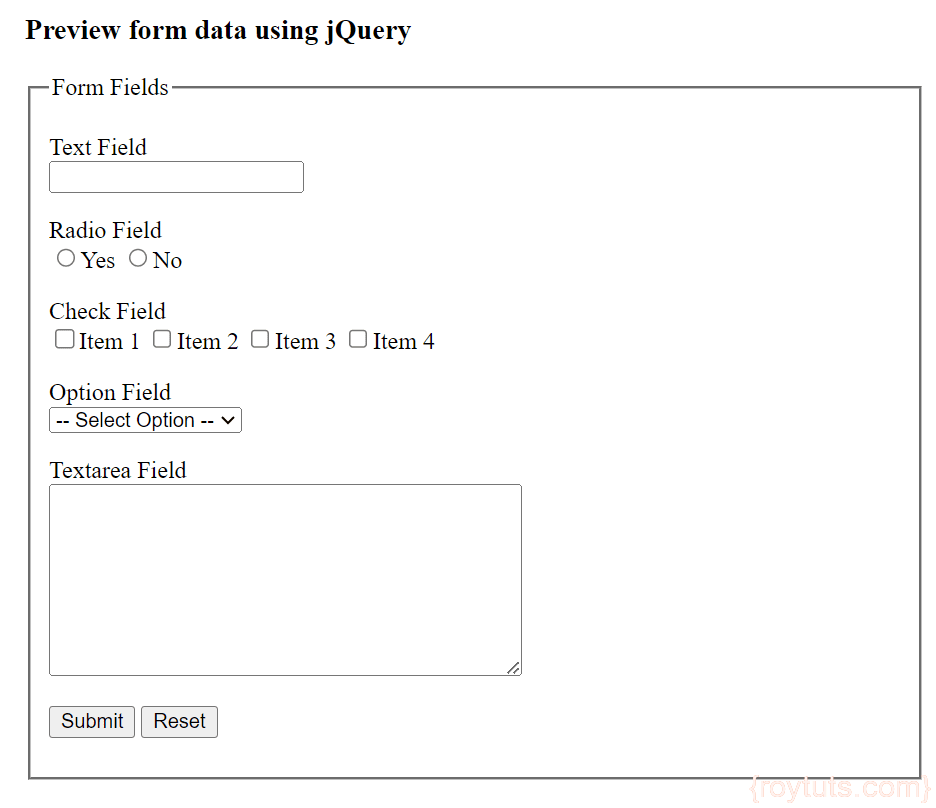
Step 2. Create an HTML file preview-form.html and write the below code inside <body></body> tag. Below code renders the form fields on browser.
<div id="container" class="container">
	<div class="form">
		<h3>Preview form data using jQuery</h3>
		<fieldset>
			<legend>Form Fields</legend>
			<form method="post" action="" id="form">
				<p>
					<label for="text">Text Field</label><br/>
					<input type="text" name="text" id="text"/>
				</p>
				<p>
					<label for="radio">Radio Field</label><br/>
					<input type="radio" name="radio" value="1">Yes</input>
					<input type="radio" name="radio" value="0">No</input>
				</p>
				<p>
					<label for="checkbox">Check Field</label><br/>
					<input type="checkbox" name="checkbox" value="1">Item 1</input>
					<input type="checkbox" name="checkbox" value="2">Item 2</input>
					<input type="checkbox" name="checkbox" value="3">Item 3</input>
					<input type="checkbox" name="checkbox" value="4">Item 4</input>
				</p>
				<p>
					<label for="optionval">Option Field</label><br/>
					<select name="optionval" id="optionval">
						<option value="">-- Select Option --</option>
						<option value="1">Option 1</option>
						<option value="2">Option 2</option>
						<option value="3">Option 3</option>
						<option value="4">Option 4</option>
					</select>
				</p>
				<p>
					<label for="textarea">Textarea Field</label><br/>
					<textarea name="textarea" id="textarea" rows="8" cols="40"></textarea>
				</p>
				<p>
					<input type="submit" name="submit" id="submit" value="Submit"/>
					<input type="reset" name="reset" value="Reset"/>
				</p>
			<form>
		</fieldset>
	</div>
	<div id="preview_data" title="Preview Form Data" style="display:none;"></div>
</div>
The above source code contains only few HTML tags for form input fields for user inputs. In real life example you may have more input fields for processing your business data.
Step 3. Include below css inside <head/> tag. This below small source code just makes the form 600px wide and margin should be equal from all sides.
<style type="text/css">
	.form {
		width:600px;
		margin: auto;
	}
</style>
Step 4. Now include jQuery files inside <head/> tag. The below jquery and jquery ui APIs are required to handling the ui events to preview form using jquery.
<script src="https://code.jquery.com/jquery-3.i.j.min.js" integrity="sha256-/JqT3SQfawRcv/BIHPThkBvs0OEvtFFmqPF/lYI/Cxo=" crossorigin="anonymous"></script>Where 3.i.j is the version of the jQuery and i, j should be replaced by the actual number.
And
<script type="text/javascript" src="https://code.jquery.com/ui/1.y.z/jquery-ui.min.js"></script>
<link rel="stylesheet" href="jquery-ui.min.css">
Where 1.y.z is the version of the jQuery UI and y, z should be replaced by the actual version.
Step 5. Write below code for previewing form data when you click on submit button. Put below code inside <head/> tag.
You may want to preview form data what user has input into the form fields when user clicks on a button before the data actually submitted to the server side.
It helps user to rectify or modify for any incorrect input in the form fields.
<script type= "text/javascript">
	$(document).ready( function() {
		$('#submit').on('click', function(e) {
			e.preventDefault();
			preview();
		});
	});

	function preview(){
		var text = $('input[name="text"]').val();
		var text_label = $('label[for="text"]').text();
		var text_data = '<p><strong>' + text_label + '</strong> : ' + text + '</p>';
		var radio = $('input[type="radio"]:checked').val();
		var radio_label = $('label[for="radio"]').text();
		var rdo = 'Undefined';
		if(radio == 0) {
			rdo = 'No';
		} else if(radio == 1) {
			rdo = 'Yes';
		}
		var radio_data = '<p><strong>' + radio_label + '</strong> : ' + rdo + '</p>';
		//var checkbox = $('input[name="checkbox"]').val();
		var checkbox_label = $('label[for="checkbox"]').text();
		var chkArray = [];
		$('input[type="checkbox"]:checked').each(function() {
			chkArray.push($(this).val());
		});
		var chkval = '';
		var chkSelected1 = false;
		var chkSelected2 = false;
		var chkSelected3 = false;
		$.each(chkArray, function( index, value ) {
			if(value == 1) {
				chkSelected1 = true;
				chkval += 'Item 1';
			} else if(value == 2) {
				if(chkSelected1) {
					chkval += ',';
				}
				chkSelected2 = true;
				chkval += 'Item 2';
			} else if(value == 3) {
				if(chkSelected2) {
					chkval += ',';
				}
				chkSelected3 = true;
				chkval += 'Item 3';
			} else if(value == 4) {
				if(chkSelected3) {
					chkval += ',';
				}
				chkval += 'Item 4';
			}
		});
		var checkbox_data = '<p><strong>' + checkbox_label + '</strong> : ' + chkval + '</p>';
		var optionval = $('#optionval option:selected').val();
		var optionval_label = $('label[for="optionval"]').text();
		var optval = '';
		if(optionval == 1) {
			optval = 'Option 1';
		} else if(optionval == 2) {
			optval = 'Option 2';
		} else if(optionval == 3) {
			optval = 'Option 3';
		} else if(optionval == 4) {
			optval = 'Option 4';
		}
		var optionval_data = '<p><strong>' + optionval_label + '</strong> : ' + optval + '</p>';
		var textarea = $('#textarea').val();
		var textarea_label = $('label[for="textarea"]').text();
		var textarea_data = '<p><strong>' + textarea_label + '</strong> : ' + textarea + '</p>';

		var data = text_data + radio_data + checkbox_data + optionval_data + textarea_data;
		$('#preview_data').html('');
		$('#preview_data').append(data);
		$('#preview_data').dialog({
			resizable: false,
			//height:140,
			modal: true,
			buttons: {
				'Submit': function() {
					//submit the form
					$(this).dialog("close");
				},
				Cancel: function() {
					$(this).dialog("close");
				}
			}
		});
	}
</script>
Step 6. Now run the file preview-form.html and see the result as I have mentioned in Final Results section below.
Final Results
On running the preview-form.html you will see below output:
After entering form field value, you will see output as shown below:

That’s all about how to preview HTML form data using jQuery.
Please Give Close form tag
I love php
After previewing the form how to submit form to server….
on the previw popup you have two buttons Submit and Cancel. so handle event on those button what you want to do. handle submit event using Submit button and handle cancel using Cancel button.