Introduction
This tutorial is about Spring Boot + Angular Functional Reactive Programming Example that will show you how you will create REST APIs using Spring Boot Functional Reactive Programming and consume these server side REST APIs using Angular Reactive Programming.
We have seen in our example on Spring Boot Functional Reactive Programming, which you must go through first in order to understand the functional reactive programming.
We will consume the server side REST APIs using popular client side technology Angular that basically uses Observer and Iterator pattern to make it work in Reactive way.
Prerequisites
Knowledge of Angular
Knowledge of HTML, JavaScript and CSS
Basic knowledge of working with NPM and Node.js
Example with Source Code
Setting up the project
We will create Angular project named as “angular-reactive“. You must go through the tutorial on how to create new Angular project on Windows in order to proceed further.
Then you can check whether your application is running or not by executing the command ng serve –open in cmd window, which will automatically open your application in browser window at http://locahost:4200.
Now let’s stop the application by pressing Ctrl+C in cmd window and proceed further…
Once you create the above mentioned project directory, you need to create few modules to perform CRUD(Create, Read, Update and Delete) operations. You can have a look at the Angular Guide on project structure, why we are creating separate modules here.
Use ng command to generate expected modules and components. Let’s create the required modules by executing following commands:
ng g c website-list
ng g c website-detail
ng g c website-new
ng g c website-edit
It is clear from the above modules naming conventions that, which module will be used for what operation. By this time you have successfully generated modules with required structures and files.
All modules get generated under src/app directory.
Make sure your src/app/app.component.html file has the following entry in order to work routing fine.
<router-outlet></router-outlet>
Importing required modules
Now we need to import additional things into src/app/app.module.ts file to look similar to the below:
import { BrowserModule } from '@angular/platform-browser';
import { NgModule } from '@angular/core';
import { FormsModule }    from '@angular/forms';
import { HttpClientModule }    from '@angular/common/http';
import { AppRoutingModule } from './app-routing.module';
import { AppComponent } from './app.component';
import { WebsiteListComponent } from './website-list/website-list.component';
import { WebsiteAddComponent } from './website-add/website-add.component';
import { WebsiteEditComponent } from './website-edit/website-edit.component';
import { WebsiteDetailComponent } from './website-detail/website-detail.component';
@NgModule({
  declarations: [
    AppComponent,
    WebsiteListComponent,
    WebsiteAddComponent,
    WebsiteEditComponent,
    WebsiteDetailComponent
  ],
  imports: [
    BrowserModule,
	FormsModule,
	AppRoutingModule,
	HttpClientModule
  ],
  providers: [],
  bootstrap: [AppComponent]
})
export class AppModule { }
You will understand as you proceed further, why we have imported additional modules like ForsModule, AppRoutingModule, HttpClientModule etc.
Defining routes
We need to define routes in order to navigate through the application, for example, you want to click on add link to add new website information, you want to click on edit link to update the existing website information etc.
Therefore, create a file called src/app/app-routing.module.ts and put below source code inside it.
import { NgModule }             from '@angular/core';
import { RouterModule, Routes } from '@angular/router';
import { WebsiteListComponent } from './website-list/website-list.component';
import { WebsiteAddComponent } from './website-add/website-add.component';
import { WebsiteEditComponent } from './website-edit/website-edit.component';
import { WebsiteDetailComponent } from './website-detail/website-detail.component';
const routes: Routes = [
  { path: '', redirectTo: '/website', pathMatch: 'full' },
  { path: 'website', component: WebsiteListComponent },
  { path: 'detail/:id', component: WebsiteDetailComponent },
  { path: 'edit/:id', component: WebsiteEditComponent },
  { path: 'add', component: WebsiteAddComponent }
];
@NgModule({
  imports: [ RouterModule.forRoot(routes) ],
  exports: [ RouterModule ]
})
export class AppRoutingModule {}
Here in the above file we redirect root path(“” or /) to list of websites page where you will see all websites listed here. We also define other routes to get website detail, to edit exiting website information and adding new website information.
Creating model class
We know that in our current technologies even on UI side we are working with objects and classes. Therefore, it is recommended to craete model object that will hold website information for performing CRUD operations.
Let’s create below model class website.ts in src/app directory with below code snippets:
export class Website {
  id?: number;
  title: string;
  url: string;
}
Notice why I have used “?” with id variable. Suppose you want to add new website information to server and while adding new website information you don’t know what would be the id value of your new website and you want id value should be generated at server side and populate that value during the storing to some persistent storage. In simple term, it indicates optional.
Creating service class
We are done with creating project structures, importing required modules, defining routing, creating model class. Now it’s turn to create service class that will interact with the server side REST APIs and give us data or push data to server side using Reactive Programming.
So let’s create the below service class that will be used by all modules for their respective required operation.
import { Injectable } from '@angular/core';
import { HttpClient, HttpHeaders } from '@angular/common/http';
import { Observable, of } from 'rxjs';
import { catchError, map, tap } from 'rxjs/operators';
import { Website } from './website';
const httpOptions = {
headers: new HttpHeaders({ 'Content-Type': 'application/json' })
};
@Injectable({ providedIn: 'root' })
export class WebsiteService {
private websiteUrl = 'http://localhost:9999/website'; // base URL to REST APIs
constructor(private http: HttpClient) { }
/** GET websites from the server */
getWebsites(): Observable<Website[]> {
return this.http.get<Website[]>(this.websiteUrl);
}
/** GET website by id. Will 404 if id not found */
getWebsite(id: number): Observable<any> {
const url = `${this.websiteUrl}/${id}`;
return this.http.get<Website>(url);
}
/** POST: add a new website to the server */
addWebsite(website: Website) {
//console.log(website);
return this.http.post(this.websiteUrl, website, httpOptions);
}
/** PUT: update the website on the server */
updateWebsite(website: Website): Observable<any> {
return this.http.put(this.websiteUrl, website, httpOptions);
}
/** DELETE: delete the website from the server */
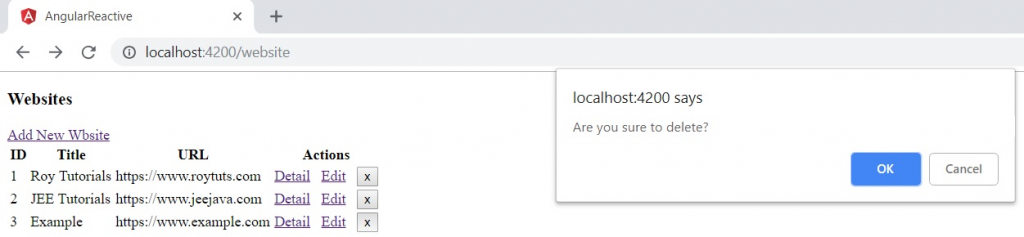
deleteWebsite(website: Website | number) {
if (confirm("Are you sure to delete?")) {
const id = typeof website === 'number' ? website : website.id;
const url = `${this.websiteUrl}/${id}`;
return this.http.delete(url, httpOptions);
}
return of({});
}
}In the above class notice how we are fetching or pushing data from/to server using Observable which will be consumed by subscribers either at client or server side.
Notice in the deleteWebsite() method, here I have put confirmation alert box, whether a user really wants to delete or not the existing website information. And finally, I have returned empty, i.e., of({}) to avoid exception on subscriber. Because if user clicks on No button on confirmation box then subscriber won’t have anything to consume.
CRUD Operations
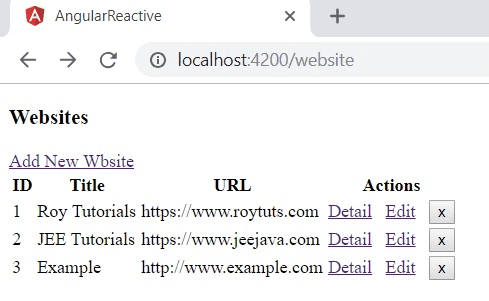
Now we will look at the CRUD operations. Open your src/app/website-list/website-list.component.html file and paste the below code into it.
<h3>Websites</h3>
<div>
	<a routerLink="/add">
		Add New Wbsite
	</a>
</div>
<table>
  <tr>
    <th>ID</th>
    <th>Title</th>
    <th>URL</th>
	<th>Actions</th>
  </tr>
  <tr *ngFor="let website of websites">
    <td>{{website.id}}</td>
    <td>{{website.title}}</td>
    <td>{{website.url}}</td>
	<td>
		<a routerLink="/detail/{{website.id}}">Detail</a>
		<a routerLink="/edit/{{website.id}}">Edit</a>
		<button title="delete website" (click)="delete(website)">x</button>
	</td>
  </tr>
</table>
In the above file we give users option for adding new website information. Then we display the fetched data from server in an HTML table. At the right-most column we have given users option for detailing, editing and deleting the website information.
Now open your corresponding file website-list.component.ts, which is in the same directory (website-list) and paste the following code snippets:
import { Component, OnInit } from '@angular/core';
import { ActivatedRoute } from '@angular/router';
import { Website } from '../website';
import { WebsiteService } from '../website.service';
@Component({
  selector: 'app-website-list',
  templateUrl: './website-list.component.html',
  styleUrls: ['./website-list.component.css']
})
export class WebsiteListComponent implements OnInit {
	websites: Website[] = [];
	constructor(private route: ActivatedRoute, private websiteService: WebsiteService) { }
	ngOnInit() {
		this.getWebsites();
	}
	getWebsites(): void {
		this.websiteService.getWebsites().subscribe(websites => this.websites = websites);
	}
	delete(website: Website): void {
		this.websiteService.deleteWebsite(website).subscribe(success => {this.getWebsites();});
	}
}
Here the code snippets are straight forward. We fetch all websites and puts into websites[] using the method getWebsites() that is called during the initialization.
We delete the existing website information using delete() method and we refresh the websites[] to get the updated list of websites.
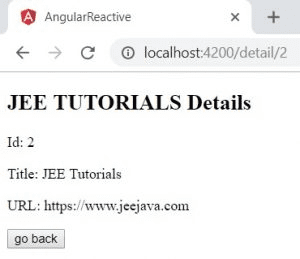
Now you would like to see detail information for a particular website by clicking on Detail link. For that you need to create required codes in your files. Open src/app/website-detail/website-detail.component.html to write below code to display the detail information.
<div *ngIf="website">
  <h2>{{website.title | uppercase}} Details</h2>
  <div><span>Id: </span>{{website.id}}</div>
  <div>
    <p>
		Title: {{website.title}}
    </p>
	<p>
		URL: {{website.url}}
    </p>
  </div>
  <button (click)="goBack()">go back</button>
</div>
We convert the website title into uppercase letters.
The corresponding src/app/website-detail/website-detail.component.ts file is given below:
import { Component, OnInit } from '@angular/core';
import { Location } from '@angular/common';
import { ActivatedRoute } from '@angular/router';
import { Website } from '../website';
import { WebsiteService } from '../website.service';
@Component({
  selector: 'app-website-detail',
  templateUrl: './website-detail.component.html',
  styleUrls: ['./website-detail.component.css']
})
export class WebsiteDetailComponent implements OnInit {
	website: Website;
	constructor(private route: ActivatedRoute, private websiteService: WebsiteService, private location: Location) { }
	ngOnInit() {
		this.getWebsite();
	}
	getWebsite(): void {
		const id = + this.route.snapshot.paramMap.get('id');
		this.websiteService.getWebsite(id).subscribe(website => this.website = website);
	}
	goBack(): void {
		this.location.back();
	}
}
We provide the go back button to go back to your list of websites page.
You also want to update your website information. So open your src/app/website-edit/website-edit.component.html file to edit the existing website information using the following code snippets:
<div *ngIf="website">
  <h2>{{website.title | uppercase}} Details</h2>
  <div><span>Id: </span>{{website.id}}</div>
  <div>
    <p>
		Title: <input [(ngModel)]="website.title" placeholder="Website Title">
    </p>
	<p>
		URL: <input [(ngModel)]="website.url" placeholder="Website URL">
    </p>
  </div>
  <button (click)="goBack()">go back</button>
  <button (click)="save()">save</button>
</div>
The corresponding src/app/website-edit/website-edit.component.ts file is given below with code snippets:
import { Component, OnInit, Input } from '@angular/core';
import { Location } from '@angular/common';
import { ActivatedRoute } from '@angular/router';
import { Website } from '../website';
import { WebsiteService } from '../website.service';
@Component({
  selector: 'app-website-edit',
  templateUrl: './website-edit.component.html',
  styleUrls: ['./website-edit.component.css']
})
export class WebsiteEditComponent implements OnInit {
	@Input() website: Website;
	constructor(private route: ActivatedRoute, private websiteService: WebsiteService, private location: Location) { }
	ngOnInit() {
		this.getWebsite();
	}
	getWebsite(): void {
		const id = + this.route.snapshot.paramMap.get('id');
		this.websiteService.getWebsite(id).subscribe(website => this.website = website);
	}
	save(): void {
		this.websiteService.updateWebsite(this.website).subscribe(success => {this.goBack();});
	}
	goBack(): void {
		this.location.back();
	}
}
Once your edit is done and after clinking on the save button, you will be redirected to the list of websites page.
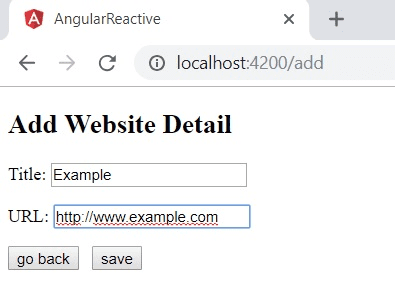
Next your users also want to add new website information by clicking on the Add New Website link given on the list of websites page. So open your src/app/app/website-add/website-add.component.html file to use the below code:
<div>
  <h2>Add Website Detail</h2>
  <div>
    <p>
		<label>Title:
			<input [(ngModel)]="website.title" placeholder="Website Title"/>
		</label>
    </p>
	<p>
		<label>URL:
			<input [(ngModel)]="website.url" placeholder="Website URL"/>
		</label>
    </p>
  </div>
  <button (click)="goBack()">go back</button>
  <button (click)="save()">save</button>
</div>
The corresponding src/app/app/website-add/website-add.component.ts file is given with below source code:
import { Component, OnInit, Input } from '@angular/core';
import { Location } from '@angular/common';
import { Website } from '../website';
import { WebsiteService } from '../website.service';
@Component({
  selector: 'app-website-add',
  templateUrl: './website-add.component.html',
  styleUrls: ['./website-add.component.css']
})
export class WebsiteAddComponent implements OnInit {
	@Input() website: Website = { title: '', url: '' };
	constructor(private websiteService: WebsiteService, private location: Location) { }
	ngOnInit() {
	}
	save(): void {
		this.websiteService.addWebsite(this.website).subscribe(() => this.goBack());
	}
	goBack(): void {
		this.location.back();
	}
}
Your are done with your hard working coding part. Now it’s time to test your application – Spring Boot + Angular Functional Reactive Programming Example.
Testing the application
You must first make sure that your Spring Boot Functional Reactive Programming example is running before you test your Angular application.
Next when you run your Angular application by executing command ng serve –open in cmd window by navigating to the appropriate project directory, you will see below page with two websites listed on the page.

When you add new website information as shown below by clicking on the link Add New Website, you will be redirected the home page with one more website information.
If you want to see the detail of any site by clicking on Detail link, for example, on JEE Tutorials.
Now let’s say you want to update information for Example to change the protocol as https. To update click on appropriate row’s Edit link and update as below:

Once you click on save button, you will be redirected to the home page with updated information:

Now when you click on the delete button (X), your website information will be deleted and you will stay on the home page with updated list. Let’s delete the Example website. When confirmation alert opens, click on Yes button to delete.
Now you will see the two websites are there as were initially when you opened the home page.
Hope you got idea on Spring Boot + Angular Functional Reactive Programming Example.
Source Code
Thanks for reading.