Auto Complete
Autocomplete allows you to easily create autocomplete and auto-suggest boxes for text input fields. When you start a search on Google, you can find the information you are looking for using search predictions. Search predictions are possible search terms you can use that are related to the terms you are typing and what other people are searching for. Spring Boot MVC autocomplete example will show you exactly the same thing here.
Autocomplete is a feature in which an application predicts the rest of a word a user is typing. In graphical user interfaces, users can typically press the tab key to accept a suggestion or the down arrow key to accept one of several.
Autocomplete speeds up human-computer interactions when it correctly predicts the word a user intends to enter after only a few characters have been typed into a text input field. The autocomplete is a normal text input enhanced by a panel of suggested options.
Here I will create Spring Boot MVC application. Here I will use jQuery AJAX based auto-complete input field.
If you need Maven based Sping Boot MVC project then you may first like to read Spring Boot MVC with Maven and Spring Boot MVC with Tiles and AJAX.
Prerequisites
Java 8+ (19), Spring Boot 2.1.7/3.0.5, Gradle 5.6, Maven 3.8.5, jQuery 1.12
Project Setup
Create a maven or gradle based project in your favorite IDE or tool. The project name is given as spring-mvc-autocomplete-input.
For maven based project you can refer to the following pom.xml file with required dependencies:
<?xml version="1.0" encoding="UTF-8"?>
<project xmlns="http://maven.apache.org/POM/4.0.0" xmlns:xsi="http://www.w3.org/2001/XMLSchema-instance"
	xsi:schemaLocation="http://maven.apache.org/POM/4.0.0 http://maven.apache.org/xsd/maven-4.0.0.xsd">
	<modelVersion>4.0.0</modelVersion>
	<groupId>com.roytuts</groupId>
	<artifactId>spring-mvc-autocomplete-input</artifactId>
	<version>0.0.1-SNAPSHOT</version>
	<properties>
		<project.build.sourceEncoding>UTF-8</project.build.sourceEncoding>
		<maven.compiler.source>19</maven.compiler.source>
		<maven.compiler.target>19</maven.compiler.target>
	</properties>
	<parent>
		<groupId>org.springframework.boot</groupId>
		<artifactId>spring-boot-starter-parent</artifactId>
		<version>3.0.5</version>
	</parent>
	<dependencies>
		<dependency>
			<groupId>org.springframework.boot</groupId>
			<artifactId>spring-boot-starter-web</artifactId>
		</dependency>
		<dependency>
			<groupId>org.apache.tomcat.embed</groupId>
			<artifactId>tomcat-embed-jasper</artifactId>
		</dependency>
		<dependency>
			<groupId>javax.servlet</groupId>
			<artifactId>jstl</artifactId>
			<version>1.2</version>
		</dependency>
	</dependencies>
	<build>
		<plugins>
			<plugin>
				<groupId>org.springframework.boot</groupId>
				<artifactId>spring-boot-maven-plugin</artifactId>
			</plugin>
		</plugins>
	</build>
</project>
The default generated build.gradle script does not include required dependencies, so I will include the required dependencies.
I am going to use JSP pages for view technologies.
buildscript {
	ext {
		springBootVersion = '2.1.7.RELEASE'
	}

    repositories {
    	mavenLocal()
    	mavenCentral()
    }

    dependencies {
    	classpath("org.springframework.boot:spring-boot-gradle-plugin:${springBootVersion}")
    }
}

apply plugin: 'java'
apply plugin: 'org.springframework.boot'

sourceCompatibility = 12
targetCompatibility = 12

repositories {
	mavenLocal()
    mavenCentral()
}

dependencies {
	implementation("org.springframework.boot:spring-boot-starter-web:${springBootVersion}")
	compile('org.apache.tomcat.embed:tomcat-embed-jasper:9.0.22')
    compile('javax.servlet:jstl:1.2')
}
DAO Class
Create below DAO class in order to provide data to the Service layer.
The actual data should come from database or any other persistent sources.
public class AutoCompleteDao {

	private static final List<String> strings;

	static {
		strings = new ArrayList<>();
		strings.add("Lorem Ipsum is simply dummy text of the printing and typesetting");
		strings.add("Lorem Ipsum has been the industry's standard dummy");
		strings.add("nd scrambled it to make a type specimen book. It");
		strings.add("typesetting, remaining essentially unchanged. It ");
		strings.add("sum passages, and more recently with desktop publi");
		strings.add("Contrary to popular belief, Lorem Ipsum is not sim");
		strings.add("professor at Hampden-Sydney College in Virginia, looked up one");
		strings.add("passage, and going through the cites of the word in");
		strings.add("comes from sections 1.10.32 and 1.10.33 of \"de Finibus Bonorum");
		strings.add("BC. This book is a treatise on the theory of ethics, very popu");
		strings.add("here are many variations of passages of Lorem Ipsum availa");
		strings.add("believable. If you are going to use a passage of Lorem Ips");
		strings.add("middle of text. All the Lorem Ipsum generators on the Intern");
		strings.add("tend to repeat predefined chunks as necessary, making this the");
		strings.add("first true generator on the Internet. It uses a dictionary of over 20");
		strings.add("he standard chunk of Lorem Ipsum used since the 1500s i");
		strings.add("1.10.33 from \"de Finibus Bonorum et Malorum\" by Cicero are als");
		strings.add("reproduced in their exact original form, accompanied by English");
		strings.add("eadable content of a page when looking at its layout. The point");
	}

	public static List<String> getStrings(final String input) {
		return strings.stream().filter(s -> s.toLowerCase().contains(input.toLowerCase())).collect(Collectors.toList());
	}

}
Service Class
Create below Service class in order to provide data to Controller layer.
I have loaded the data from DAO layer through the below service class.
@Service
public class AutoCompleteService {

	public List<String> doAutoComplete(final String input) {
		return AutoCompleteDao.getStrings(input);
	}

}
You may also like to read the similar tutorial on Codeigniter jQuery .
REST Controller
Create Rest Controller that returns JSON data to the view.
I have invoked the REST API endpoint through AJAX technique. I am using jQuery UI library directly from CDN to call the REST API.
@RestController
public class AutoCompleteRestController {

	@Autowired
	AutoCompleteService autoCompleteService;

	@GetMapping("/search")
	public ResponseEntity<String> doAutoComplete(@RequestParam("q") final String input) {
		List<String> strings = autoCompleteService.doAutoComplete(input);

		ObjectMapper mapper = new ObjectMapper();
		String resp = "";

		try {
			resp = mapper.writeValueAsString(strings);
		} catch (JsonProcessingException e) {
		}

		return new ResponseEntity<String>(resp, HttpStatus.OK);
	}

}
REST Controller Class
As the project is Spring Boot MVC then I need to have an index page so that when client hits the base URL, the application will display the home page.
Therefore I need the below Controller class to redirect to the home page.
@Controller
public class HomeController {

	@RequestMapping("/")
	public String home() {
		return "index";
	}

}
View File
Now create below index.jsp file and put it under src/main/webapp/views/ directory.
I will show input field in this page and in this input field when a user types character, the page will show a list of results coming from a source – database, external API etc.
I am using AJAX technique with jQuery library to call the REST controller’s method at endpoint.
<%@ page language="java" contentType="text/html; charset=ISO-8859-1"
	pageEncoding="ISO-8859-1"%>
<head>
<meta http-equiv="Content-Type" content="text/html; charset=ISO-8859-1" />
<meta name="viewport" content="width=device-width, initial-scale=1">
<title>Spring Boot MVC Auto-Complete using jQuery</title>
<link rel="stylesheet"
	href="https://code.jquery.com/ui/1.12.1/themes/base/jquery-ui.css">
<link rel="stylesheet" href="/static/css/style.css">
<style>
.ui-autocomplete-loading {
	background: white url("/static/images/ui-anim_basic_16x16.gif") right
		center no-repeat;
}
</style>
<script src="https://code.jquery.com/jquery-1.12.4.js"></script>
<script src="https://code.jquery.com/ui/1.12.1/jquery-ui.js"></script>
<script>
	$(function() {
		$("#searchBox").autocomplete({
			source : function(request, response) {
				$.ajax({
					url : "http://localhost:8080/search",
					dataType : "json",
					data : {
						q : request.term
					},
					success : function(data) {
						//alert(data);
						console.log(data);
						response(data);
					}
				});
			},
			minLength : 2
		});
	});
</script>
</head>
<body>
	<div style="width: 600px; margin: auto;">
		<h3>Spring Boot MVC Auto-Complete using jQuery</h3>
		<fieldset>
			<legend>Search Here</legend>
			<p>
				<input type="text" name="search" id="searchBox"
					style="width: 560px; margin: auto;" />
			</p>
		</fieldset>
	</div>
</body>
Here I have used jQuery and jQuery’s UI library to get the benefits of Autocomplete functionality.
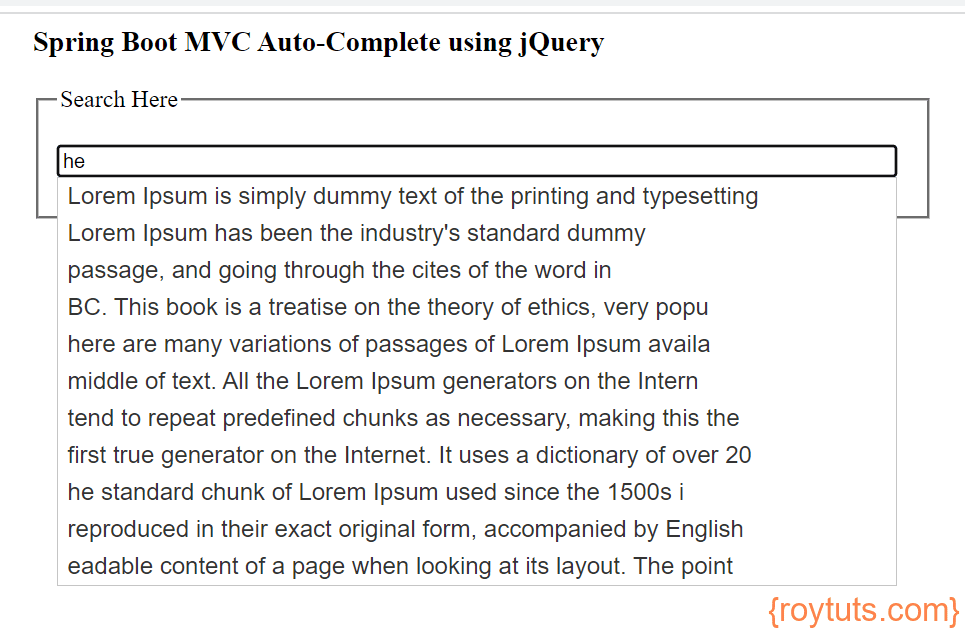
To get the desired result you have to type consecutively minimum two characters.
Applying Style
Add some style using below style.css file that should be kept under src/main/webapp/static/css/ directory.
/*
Theme Name: jqueryui-com
Template: jquery
*/
a, .title {
	color: #b24926;
}
#content a:hover {
	color: #333;
}
#banner-secondary p.intro {
	padding: 0;
	float: left;
	width: 50%;
}
#banner-secondary .download-box {
	border: 1px solid #aaa;
	background: #333;
	background: -webkit-linear-gradient(left, #333 0%, #444 100%);
	background: linear-gradient(to right, #333 0%, #444 100%);
	float: right;
	width: 40%;
	text-align: center;
	font-size: 20px;
	padding: 10px;
	border-radius: 5px;
	box-shadow: 0 0 8px rgba(0, 0, 0, 0.8);
}
#banner-secondary .download-box h2 {
	color: #71d1ff;
	font-size: 26px;
}
#banner-secondary .download-box .button {
	float: none;
	display: block;
	margin-top: 15px;
}
#banner-secondary .download-box p {
	margin: 15px 0 5px;
}
#banner-secondary .download-option {
	width: 45%;
	float: left;
	font-size: 16px;
}
#banner-secondary .download-legacy {
	float: right;
}
#banner-secondary .download-option span {
	display: block;
	font-size: 14px;
	color: #71d1ff;
}
#content .dev-links {
	float: right;
	width: 30%;
	margin: -15px -25px .5em 1em;
	padding: 1em;
	border: 1px solid #666;
	border-width: 0 0 1px 1px;
	border-radius: 0 0 0 5px;
	box-shadow: -2px 2px 10px -2px #666;
}
#content .dev-links ul {
	margin: 0;
}
#content .dev-links li {
	padding: 0;
	margin: .25em 0 .25em 1em;
	background-image: none;
}
.demo-list {
	float: right;
	width: 25%;
}
.demo-list h2 {
	font-weight: normal;
	margin-bottom: 0;
}
#content .demo-list ul {
	width: 100%;
	border-top: 1px solid #ccc;
	margin: 0;
}
#content .demo-list li {
	border-bottom: 1px solid #ccc;
	margin: 0;
	padding: 0;
	background: #eee;
}
#content .demo-list .active {
	background: #fff;
}
#content .demo-list a {
	text-decoration: none;
	display: block;
	font-weight: bold;
	font-size: 13px;
	color: #3f3f3f;
	text-shadow: 1px 1px #fff;
	padding: 2% 4%;
}
.demo-frame {
	width: 70%;
	height: 420px;
}
.view-source a {
	cursor: pointer;
}
.view-source>div {
	overflow: hidden;
	display: none;
}
@media all and (max-width: 600px) {
	#banner-secondary p.intro, #banner-secondary .download-box {
		float: none;
		width: auto;
	}
	#banner-secondary .download-box {
		overflow: auto;
	}
}
@media only screen and (max-width: 480px) {
	#content .dev-links {
		width: 55%;
		margin: -15px -29px .5em 1em;
		overflow: hidden;
	}
}
Adding Image
Add the rotating image to Autocomplete input box. Download the image and put it under src/main/webapp/static/images/ directory. rename the downloaded image as ui-anim_basic_16x16.gif.

Application Properties
Here is the src/amin/resources/application.properties file that resolves the view resolver for JSP pages.
#view resolver
spring.mvc.view.prefix=/views/
spring.mvc.view.suffix=.jsp
Spring Boot Main Class
For Spring Boot application, a main class with @SpringBootApplication annotation is enough to deploy the application into embedded Tomcat server.
@SpringBootApplication
public class SpringMvcAutocompleteInputApp {

	public static void main(String[] args) {
		SpringApplication.run(SpringMvcAutocompleteInputApp.class, args);
	}

}
Testing the Auto Complete Application
Once you run the above main class, your application will be deployed into the server at port 8080.
You can hit the URL http://localhost:8080/ in the browser and try to type something.
One example is shown in the below image.
You may also like to read the similar tutorial on Codeigniter jQuery