Introduction
Here we will see an example on WebSocket on Spring MongoDB Reactive Programming. In past we have see few examples on WebSocket but this example will use Spring WebFlux, i.e., WebSocket on Spring Reactive API.
WebFlux includes reactive WebSocket client and server support. Both client and server are supported on the Java WebSocket API (JSR-356), Jetty, Undertow, Reactor Netty, and RxNetty.
On the server side, declare a WebSocketHandlerAdapter and then simply add mappings to WebSocketHandler-based endpoints.
What is WebSocket?
The WebSocket protocol provides a standardized way to establish a full-duplex, two-way communication channel between client and server over a single TCP connection. It is a different TCP protocol from HTTP but is designed to work over HTTP, using ports 80 and 443 and allowing re-use of existing firewall rules.
A WebSocket interaction begins with an HTTP request that uses the HTTP Upgrade header to upgrade or, to switch to the WebSocket protocol.
After a successful handshake, the TCP socket underlying the HTTP upgrade request remains open for both the client and the server to continue to send and receive messages.
Prerequisites
Eclipse Neon, Java 1.8, Gradle 5.4.1, Spring Boot 2.1.6, WebSocket 1.1, MongoDB 4.0.10
Example
Here we will create a simple small example on WebSocket on Spring MongoDB Reactive Programming, where a user subscribe his/her email address and receives the subscription response asynchronously from the server.
We are using here MongoDB as a persistence storage. You can use other persistence storage that supports reactive API.
Creating Project
Create a gradle based project in Eclipse with the name spring-boot-reactive-websocket-mogodb.
Updating Build Script
As soon as project creation is done in eclipse, update the build.gradle file with the below content to include required dependencies.
buildscript {
    ext {
        springBootVersion = '2.1.6.RELEASE'
    }
    repositories {
        mavenCentral()
    }
    dependencies {
        classpath("org.springframework.boot:spring-boot-gradle-plugin:${springBootVersion}")
    }
}
apply plugin: 'java'
apply plugin: 'org.springframework.boot'
sourceCompatibility = 1.8
targetCompatibility = 1.8
repositories {
    mavenCentral()
}
dependencies {
    implementation("org.springframework.boot:spring-boot-starter-webflux:${springBootVersion}")
    implementation("org.springframework.boot:spring-boot-starter-data-mongodb-reactive:${springBootVersion}")
	implementation('javax.websocket:javax.websocket-api:1.1')
}
Configuring MongoDB
Go through the tutorial Installing Zip version on MongoDB in Windows to configure MongoDB.
Now create an application.properties file under src/main/resources folder to use roytuts database otherwise by default, MongoDB server uses test database.
spring.data.mongodb.database=roytutsCreating Entity Class
To work with the database server and to perform database operations for our data, we need to create an entity class to map database collection or table with Java object.
Note that I have mentioned the collection name or document name where our data will be stored. If you do not specify any name then the entity class name will be used as a collection name.
Below is the entity class that will be used for this purpose:
package com.roytuts.spring.boot.reactive.websocket.mogodb.entity;
import org.springframework.data.annotation.Id;
import org.springframework.data.mongodb.core.mapping.Document;
@Document(collection = "UserSubscription")
public class UserSubscription {
	@Id
	private String id;
	private String email;
	public UserSubscription() {
	}
	public UserSubscription(String email) {
		this.email = email;
	}
	//getters and setters
}
Creating Repository
Database operations happen with the interaction of repository. So here we will create a simple Reactive Repository to perform our save operation.
We will use Spring’s built-in API to get advantage of basic CRUD operations without declaring any method in it.
package com.roytuts.spring.boot.reactive.websocket.mogodb.repository;
import org.springframework.data.mongodb.repository.ReactiveMongoRepository;
import com.roytuts.spring.boot.reactive.websocket.mogodb.entity.UserSubscription;
public interface UserSubscriptionRepository extends ReactiveMongoRepository<UserSubscription, String> {
}
Creating WebSocketHandler
To create a WebSocket server, we need first create a WebSocketHandler.
The handle method of WebSocketHandler takes WebSocketSession and returns Mono to indicate when application handling of the session is complete. The session is handled through two streams, one for inbound and one for outbound messages.
We receive the message or specifically for this example an email address from client and save it to the MongoDB server and finally send the saved email address(which is returned from repository.save() method) to the client.
package com.roytuts.spring.boot.reactive.websocket.mogodb.handler;
import org.springframework.beans.factory.annotation.Autowired;
import org.springframework.beans.factory.config.ConfigurableBeanFactory;
import org.springframework.context.annotation.Scope;
import org.springframework.stereotype.Component;
import org.springframework.web.reactive.socket.WebSocketHandler;
import org.springframework.web.reactive.socket.WebSocketSession;
import com.roytuts.spring.boot.reactive.websocket.mogodb.entity.UserSubscription;
import com.roytuts.spring.boot.reactive.websocket.mogodb.repository.UserSubscriptionRepository;
import reactor.core.publisher.Mono;
@Component
@Scope(value = ConfigurableBeanFactory.SCOPE_PROTOTYPE)
public class UserSubscriptionWebSocketHandler implements WebSocketHandler {
	@Autowired
	private UserSubscriptionRepository repository;
	@Override
	public Mono<Void> handle(WebSocketSession session) {
		return session.send(
				session.receive().map(email -> new UserSubscription(email.getPayloadAsText())).flatMap(repository::save)
						.map(us -> session.textMessage(us.getEmail())));
	}
}
Configuring WebSocket Server
The RequestUpgradeStrategy for each server exposes WebSocket-related configuration options available for the underlying WebSocket engine. The following example sets WebSocket options when running on Tomcat or Netty server.
To use Tomcat server configuration, you need to uncomment the commented lines and comment the lines for Netty server.
package com.roytuts.spring.boot.reactive.websocket.mogodb.config;
import java.util.HashMap;
import java.util.Map;
import org.springframework.beans.factory.annotation.Autowired;
import org.springframework.context.annotation.Bean;
import org.springframework.context.annotation.Configuration;
import org.springframework.core.Ordered;
import org.springframework.web.reactive.HandlerMapping;
import org.springframework.web.reactive.handler.SimpleUrlHandlerMapping;
import org.springframework.web.reactive.socket.WebSocketHandler;
import org.springframework.web.reactive.socket.server.WebSocketService;
import org.springframework.web.reactive.socket.server.support.HandshakeWebSocketService;
import org.springframework.web.reactive.socket.server.support.WebSocketHandlerAdapter;
import org.springframework.web.reactive.socket.server.upgrade.ReactorNettyRequestUpgradeStrategy;
import com.roytuts.spring.boot.reactive.websocket.mogodb.handler.UserSubscriptionWebSocketHandler;
@Configuration
public class WebSocketHandlerConfig {
	@Autowired
	private UserSubscriptionWebSocketHandler userSubscriptionWebSocketHandler;
	@Bean
	public HandlerMapping handlerMapping() {
		Map<String, WebSocketHandler> map = new HashMap<>();
		map.put("/subscribe", userSubscriptionWebSocketHandler);
		SimpleUrlHandlerMapping mapping = new SimpleUrlHandlerMapping();
		mapping.setUrlMap(map);
		mapping.setOrder(Ordered.HIGHEST_PRECEDENCE);
		return mapping;
	}
	@Bean
	public WebSocketHandlerAdapter handlerAdapter(WebSocketService webSocketService) {
		return new WebSocketHandlerAdapter(webSocketService);
	}
	@Bean
	public WebSocketService webSocketService() {
		// TomcatRequestUpgradeStrategy strategy = new TomcatRequestUpgradeStrategy();
		ReactorNettyRequestUpgradeStrategy strategy = new ReactorNettyRequestUpgradeStrategy();
		// strategy.setMaxSessionIdleTimeout(0L); //for Tomcat server
		return new HandshakeWebSocketService(strategy);
	}
}
Creating Main Class
Creating a main would be sufficient to deploy our application into the embedded Netty server.
This is a great advantage that you just need to let Spring know that it is your Spring Boot Application using @SpringBootApplication and main class.
We also need to tell Spring where our entity class and reactive repository interface.
package com.roytuts.spring.boot.reactive.websocket.mogodb.app;
import org.springframework.boot.SpringApplication;
import org.springframework.boot.autoconfigure.SpringBootApplication;
import org.springframework.boot.autoconfigure.domain.EntityScan;
import org.springframework.data.mongodb.repository.config.EnableReactiveMongoRepositories;
@EntityScan("com.roytuts.spring.boot.reactive.websocket.mogodb.entity")
@EnableReactiveMongoRepositories("com.roytuts.spring.boot.reactive.websocket.mogodb.repository")
@SpringBootApplication(scanBasePackages = "com.roytuts.spring.boot.reactive.websocket.mogodb")
public class SpringReactiveWebSocketMongoDbApp {
	public static void main(String[] args) {
		SpringApplication.run(SpringReactiveWebSocketMongoDbApp.class, args);
	}
}
Running the Application
Run the main class to start the application. The application will start on embedded Netty server’s port 8080.
Make sure your MongoDB server is running.
Testing the Application
We will create a client using HTML and JavaScript to test our WebSocket Spring Reactive Programming with MongoDB.
JavaScript Part
We will define few JavaScript(JS) functions to let our client work with server counterpart.
Notice the URL in this JS file, we have ws instead of http/https.
var ws = null;
var url = "ws://localhost:8080/subscribe";
function setConnected(connected) {
    document.getElementById('connect').disabled = connected;
    document.getElementById('disconnect').disabled = !connected;
	document.getElementById('email').disabled = !connected;
    document.getElementById('subscribe').disabled = !connected;
}
function connect() {
    ws = new WebSocket(url);
    ws.onopen = function() {
        setConnected(true);
        document.getElementById('msg').innerHTML = '<span style="color:green; font-weight: bolder; margin-top: 5px;">Connected to server</span>';
    };
    ws.onmessage = function(event) {
		document.getElementById('msg').innerHTML = '<span style="color:green; font-weight: bolder; margin-top: 5px;">Successfully subscribed => ' + event.data + '</span>';
    };
    ws.onclose = function(event) {
        setConnected(false);
        document.getElementById('msg').innerHTML = '<span style="color:red; font-weight: bolder; margin-top: 5px;">Disconnected from server</span>';
    };
}
function disconnect() {
    if (ws != null) {
        ws.close();
        ws = null;
    }
    setConnected(false);
}
function subscribe() {
    if (ws != null) {
        var email = document.getElementById('email').value;
        ws.send(email);
    } else {
        document.getElementById('msg').innerHTML = '<span style="color:red; font-weight: bolder; margin-top: 5px;">Not connected to server, please connect</span>';
    }
}
HTML Part
Create a file called index.html and include the above JS file into head section of the HTML file.
<!DOCTYPE html>
<html>
<head>
<script type="text/javascript" src="app.js"></script>
</head>
<body>
    <div>
        <div>
            <div>
                <button id="connect" onclick="connect();">Connect to Server</button>
                <button id="disconnect" disabled="disabled" onclick="disconnect();">Disconnect from Server</button>
            </div>
            <div>
                <input type="text" id="email" placeholder="Enter valid email address to subscribe" disabled="disabled" style="width: 350px; margin: 5px 0;">
            </div>
            <div class="row">
                <button id="subscribe" onclick="subscribe();" disabled="disabled">Subscribe Me</button>
            </div>
        </div>
		<div id="msg"></div>
    </div>
</body>
</html>
When you run the above HTML file just by clicking on it (do right click on the index.html -> open with your favorite browser).
You should see below output:
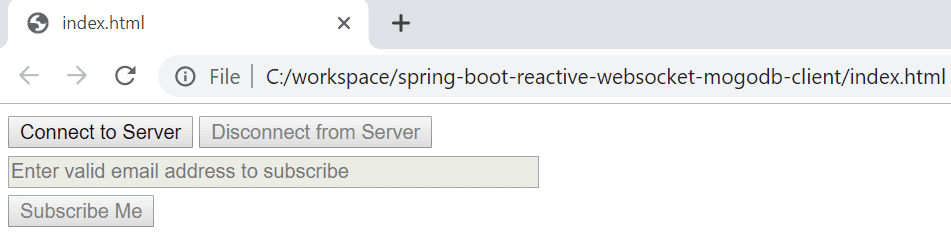
As you see, few buttons and input box are disabled initially until you connect to the server.
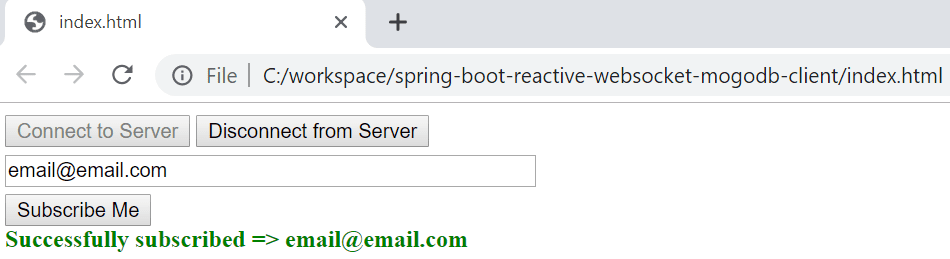
Next step is, connect to the server using Connect to Server button. Input email address and click on Subscribe Me button. You should see below output:
Now check also into MongoDB server by executing the command db.UserSubscription.find() using MongoDB client tool.
You will find one entry as shown below:

That’s all. Hope you found this example useful.
Source Code
Thanks for reading.