Dockerize Django MySQL App
In this tutorial I will show you how to dockerize Django MySQL app using docker compose in Linux environment. So why do you need docker compose when you have docker container? Generally it is said to be best practices when each docker container runs a process with single responsibility, but for this application you need two containers – one is for Django app and another one is for MySQL server.
Therefore two containers are running independently and to establish communication between two containers you need docker compose.
Docker compose is basically a three-step process:
- Define your app’s environment with a Dockerfile so it can be reproduced anywhere.
- Define services that make up your app in docker-compose.yml so they can be run together in an isolated environment.
- Run docker-compose up and compose starts and runs your entire app.
Prerequisite
Docker and Docker Compose
Docker Compose Installation
Use the following command to install Docker Compose in your system. I am installing it under Linux environment CentOS operating system.
I am using latest release version 1.26.2/2.20.2, you can check for the latest release version and also use.
$ sudo curl -L "https://github.com/docker/compose/releases/download/x.xx.x/docker-compose-$(uname -s)-$(uname -m)" -o /usr/local/bin/docker-composeIt may ask for password and you can enter for your user’s password.
Next set the permission to make the binary executable using the following command:
$ sudo chmod +x /usr/local/bin/docker-composeFinally verify that the installation was successful by checking the version using the following command.
For docker version 2.20.2, you can use the following command:
docker compose versionYou will get the following information:
Docker Compose version v2.20.2For docker version 1.26.2, you can use the following command:
$ docker-compose --versionIt will show you the following information:
docker-compose version 1.26.2, build eefe0d31Please make sure you follow the directory structure as given in the source code.
Project Directory Setup
The root directory under which I am going to put my django app, database script and docker compose file is django-mysql. Under this root directory I have db and djangomysql directories to put MySQL table script and django app respectively.
Download the source code to have the exact directory structure which will help you to follow the tutorial.
You can also follow the tutorial Django and MySQL app which is similar to this tutorial.
Dokerfile
Next you need to create a Dockerfile under your djangomysql directory with the following content.
FROM python:3.11.5-alpine
#FROM python:3.8.5-alpine

COPY . /app
WORKDIR /app

RUN apk add --no-cache mariadb-connector-c-dev
RUN apk update && apk add python3 python3-dev mariadb-dev build-base && pip3 install mysqlclient && apk del python3-dev mariadb-dev build-base

RUN apk add netcat-openbsd

RUN pip install -r requirements.txt
So I am downloading the Python alpine image 3.8.5 using FROM python:3.8.5-alpine.
I am copying all files/folders from the current directory to app directory. Setting working directory as app directory using WORKDIR command.
Next I am installing mariadb-connector-c-dev which is required to install mariadb-dev which is required for mysqlclient installation for connecting to MySQL database. I am also deleting the mariadb-dev once mysqlclient installation is done because it was required for mysqlclient installation only.
Then I am installing nc (netcat) package to check status of a particular host and port. For my example I want to check MySQL server host and port. You will know later why it is required. Note that apt-get command will not work for alpine based images, so I have used apk based command, for example, apk add netcat-openbsd.
requirements.txt
The file, requirements.txt, is generally created under the directory djangomysql to declare what all Python packages you need to install in the container. Here I am installing Django and django-mysql.
For Django version 4.x.x, you can use the following content:
Django==4.2.5
django-mysql==4.11.0
For Django version 3.x.x, you can use the following content:
Django==3.0.8
django-mysql==3.8.1
wait.sh
This shell script is created under the djangomysql directory. The purpose of this script is to wait for the database server to be up and running otherwise your django app may be up and running before your MySQL server gets up and try to connect to MySQL server and will throw error.
So here I am checking whether MySQL server is running or not on port 3306 and host db. db is the service name which you will find in the docker-compose.yml file later. I am also sleeping 3 seconds before checking again whether MySQL server is up or not.
Finally when MySQL server is up and running I am executing the command python manage.py runserver 0.0.0.0:8000 to run django app.
#!/bin/sh

while ! nc -z db 3306 ; do
    echo "Waiting for the MySQL Server"
    sleep 3
done

python manage.py runserver 0.0.0.0:8000
Docker Compose
I already explained why do you need docker compose in my initial discussion. So here I am going to show you the whole content for docker-compose.yml/yaml file.
I have used depend-on to arrange the services in order but it does not guarantee that the services kept in order will be executing first and here the situation where you need to control the execution of your services using shell script. You can also use links but it has been deprecated in version 3.
version: "3" #optional for docker 2.xx.x
services:
  app:
    build:
      context: ./djangomysql
      dockerfile: Dockerfile
    entrypoint: ["./wait.sh"]
    depends_on: #links:   #depends-on for docker 1.x.x version
      - db
    ports:
      - "8000:8000"

  db:
    image: mysql:8.0.21
    ports:
      - "30000:3306"
    environment:
      MYSQL_ROOT_PASSWORD: root
    volumes:
      - ./db:/docker-entrypoint-initdb.d/:ro
I am not going to explain what all are keywords used in the aove file but you can read Dockerize Flask MySQL App and Dockerize Spring Boot App to understand the file content.
The entrypoint keyword is used to here to execute the shell script file, i.e., wait.sh.
The restart I have used here if app fails to start then only restart the app.
I have mentioned which directory to look for Dockerfile in the app for building the image.
Testing the Django MySQL App
Well, I am done with my coding and the required docker configurations.
Execute the command $ docker-compose up to bring up all services. Wait for few moments, the docker will pull the required images and build the apps and starts up all apps.
If you think that something went wrong in your apps then you can remove all images using the command $ docker-compose down --rmi all or for docker version 2.x you can use $ docker compose down --rmi all.
You can also execute command $ docker-compose up --build to re-build your images or $ docker compose up --build for docker version 2.x.
Once your app and MySQL server are running you will see below output. You will also see in the output that your django app is waiting for MySQL server to be up:

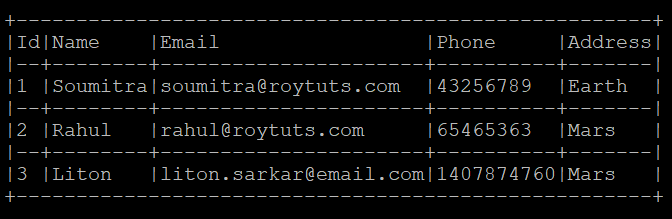
The output you will get from the app is shown below:
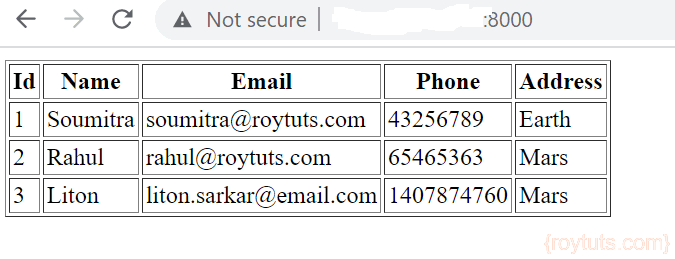
You can access the URL (http://<IP Address>:8000) in browser also to see the output:
You can also access your MySQL server which is running inside the docker container using the following command:
$ mysql --host=127.0.0.1 --port=30000 -u root -pWhen it prompts for password, enter your password to get the MySQL client terminal. The port which you see here 30000 is the external port but the port 3306 is used inside the container.
Why I am using different port because 3306 port is already used by MySQL server which is accessible publicly and will be a conflict with the container’s port if I use the same port outside the container.
depend-on syntex does not support.
You need to use the underscore instead of the dash. depend_on like so
May be your are talking about different version.