Introduction
Here you will see tutorial on Spring Boot + ReactJS Example. The backend application is built using Spring Boot framework that exposes RESTful APIs for performing CRUD operations. You might have seen many examples of Spring MVC web application application using JSP as a front-end technology but here I will use React JS as a front-end technology to build the UI (User Interface). You might have also seen how to Create CRUD Web App using Spring + AngularJS. You can also find my other tutorials on ReactJS.
I will basically create two projects – one is frontend or client side called spring-boot-react-crud-app and another one is backend called spring-boot-react-crud-api.
Prerequisites
Java 1.8+, Spring Boot 2.5.6
React 17.0.2, node 16.12.0, npm 8.1.0
How to create React JS application.
Backend – Spring Boot
Project Setup
Create a maven based project in your favorite tool or IDE. The name of the project is spring-boot-react-crud-api. The pom.xml file with the required dependencies is given below:
<?xml version="1.0" encoding="UTF-8"?>

<project xmlns="http://maven.apache.org/POM/4.0.0"
	xmlns:xsi="http://www.w3.org/2001/XMLSchema-instance"
	xsi:schemaLocation="http://maven.apache.org/POM/4.0.0 http://maven.apache.org/xsd/maven-4.0.0.xsd">
	<modelVersion>4.0.0</modelVersion>

	<groupId>com.roytuts</groupId>
	<artifactId>spring-boot-react-crud-api</artifactId>
	<version>0.0.1-SNAPSHOT</version>

	<properties>
		<project.build.sourceEncoding>UTF-8</project.build.sourceEncoding>
		<maven.compiler.source>11</maven.compiler.source>
		<maven.compiler.target>11</maven.compiler.target>
	</properties>

	<parent>
		<groupId>org.springframework.boot</groupId>
		<artifactId>spring-boot-starter-parent</artifactId>
		<version>2.5.6</version>
	</parent>

	<dependencies>
		<dependency>
			<groupId>org.springframework.boot</groupId>
			<artifactId>spring-boot-starter-web</artifactId>
		</dependency>
	</dependencies>

	<build>
		<plugins>
			<plugin>
				<groupId>org.springframework.boot</groupId>
				<artifactId>spring-boot-maven-plugin</artifactId>
			</plugin>
		</plugins>
	</build>
</project>
Model Class
Create below model class that will give you object as per your needs. This class has few attributes to hold about the website information.
public class Website {
    private Integer id;
    private String url;
    private String title;
    //getters and setters
}
Repository Class
You need to create a repository class in order to perform CRUD operations and this repository will also provide data to end users from your REST services. Ideally your source of data should be some persistence storage like database but for this example purpose, I am not using any persistent storage.
@Component
public class WebsiteRepository {
    private static final Map<Integer, Website> WEBSITES = new HashMap<>();
    private static Integer counter = 0;
    public List<Website> findAll() {
        return new ArrayList<>(WEBSITES.values());
    }
    public Website findById(Integer id) {
        return WEBSITES.get(id);
    }
    public void add(Website website) {
        counter++;
        website.setId(counter);
        WEBSITES.put(counter, website);
    }
    public void update(Website website) {
        WEBSITES.put(website.getId(), website);
    }
    public void delete(Integer id) {
        WEBSITES.remove(id);
    }
}
Service Class
Any business logic or processing should be written in the service layer code and should be loosely coupled. Here I will only create class but ideally you should create Interface and class should implement the Interface.
@Service
public class WebsiteService {
    @Autowired
    private WebsiteRepository websiteRepository;
    public List<Website> getWebsites() {
        System.out.println("Total Websites: " + websiteRepository.findAll().size());
        return websiteRepository.findAll();
    }
    public Website getWebsite(final Integer id) {
        if (id == null || id == 0) {
            throw new RuntimeException("You must provide valid website id");
        }
        Website website = websiteRepository.findById(id);
        if (website == null) {
            throw new RuntimeException("Website detail not found for the given id => " + id);
        } else {
            return website;
        }
    }
    public void deleteWebsite(final Integer id) {
        if (id == null || id == 0) {
            throw new RuntimeException("You must provide valid website id");
        }
        try {
            websiteRepository.delete(id);
        } catch (Exception e) {
            throw new RuntimeException("Website detail not found for the given id => " + id);
        }
    }
    public void saveWebsite(final Website website) {
        if (website == null || (website.getTitle() == null && website.getUrl() == null)) {
            throw new RuntimeException("You must provide Website details");
        }
        try {
            websiteRepository.add(website);
        } catch (Exception e) {
            throw new RuntimeException("Error occurred during website details saving");
        }
    }
    public void updateWebsite(final Website website) {
        if (website == null || ((website.getId() == null || website.getId() == 0) && website.getTitle() == null && website.getUrl() == null)) {
            throw new RuntimeException("You must provide Website details");
        }
        try {
            websiteRepository.update(website);
        } catch (Exception e) {
            throw new RuntimeException("Error occurred during website details updating");
        }
    }
}
REST Controller Class
You will provide REST service end-points in order to let end users consume data from your services.
@RestController
@CrossOrigin(value = "*")
public class WebsiteRestController {

	@Autowired
	private WebsiteService websiteService;

	@GetMapping("/websites")
	public ResponseEntity<List<Website>> getWebsites() throws Exception {
		return new ResponseEntity<List<Website>>(websiteService.getWebsites(), HttpStatus.OK);
	}

	@GetMapping("/website/search/{id}")
	public ResponseEntity<Website> getWebsite(@PathVariable Integer id) throws Exception {
		return new ResponseEntity<Website>(websiteService.getWebsite(id), HttpStatus.OK);
	}

	@PostMapping("/website/add")
	public ResponseEntity<Void> saveWebsite(@RequestBody Website website) throws Exception {
		websiteService.saveWebsite(website);
		return new ResponseEntity<Void>(HttpStatus.CREATED);
	}

	@PostMapping("/website/update")
	public ResponseEntity<Void> updateWebsite(@RequestBody Website website) throws Exception {
		websiteService.updateWebsite(website);
		return new ResponseEntity<Void>(HttpStatus.OK);
	}

	@GetMapping("/website/delete/{id}")
	public ResponseEntity<Website> deleteWebsite(@PathVariable Integer id) throws Exception {
		websiteService.deleteWebsite(id);
		return new ResponseEntity<Website>(HttpStatus.OK);
	}

}
Notice how I have fixed the error No ‘Access-Control-Allow-Origin’ header is present on the requested resource using @CrossOrigin annotation by allowing all clients to access REST APIs. Ideally you should allow only those clients whom you think are eligible.
Spring Boot Main Class
Now when you are ready to deploy with your coding done then you need to have some trigger point through which you will deploy your application. Here is the standalone main class that deploys your Spring Boot application into Tomcat container.
@SpringBootApplication
public class SpringReactCrudApiApp {

	public static void main(String[] args) {
		SpringApplication.run(SpringReactCrudApiApp.class, args);
	}

}
Testing Spring Boot REST Application
You can use REST client tool, for example, Postman to create a new website:
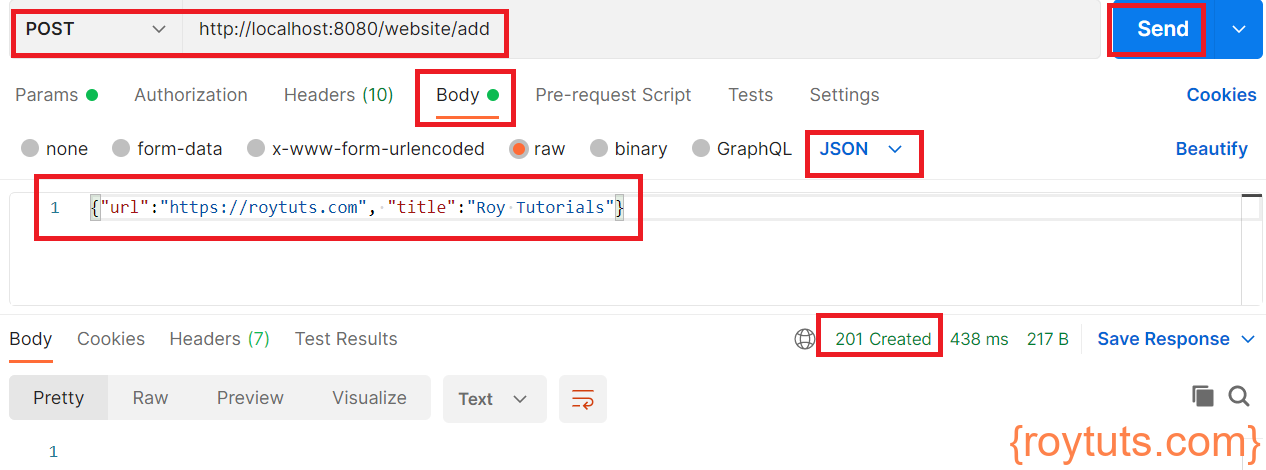
You can also retrieve website information using Postman tool:

You can also perform other operations.
Frontend – ReactJS
Now I will create client side UI code using ReactJS framework.
Project Setup
Please read how to setup node.js in Windows before you create the ReactJS application.
React app root directory called spring-boot-react-crud-app.
I will write everything into js (javaScript) files under src folder. I want to keep each component’s js file under src/components folder. Therefore create components directory under src folder.
I am going to create route for the application navigation, so you need to install react dom route by executing the command from CLI tool – npm install --save react-router-dom@5.
Apply Basic Style
Create below website.css file under src directory to apply some basic style to the UI (User Interface).
#container {
	width: 800px;
	margin: auto;
}
table {
	border-collapse: collapse;
	width: 800px;
	margin: 10px auto;
}
th, td {
	border: 1px solid #ddd;
	text-align: left;
	padding: 8px;
}
tr:nth-child(even) {
	background-color: #f2f2f2
}
tr:hover {
	background-color: #ddd;
}
th {
	padding-top: 12px;
	padding-bottom: 12px;
	text-align: left;
	background-color: #4CAF50;
	color: white;
}
index.js file
This file is the root file and it defines all paths required to navigate once your application functionality is displayed on ReactJS UI. You may click on link for creating new website, you may click on update link for updating existing website information etc.
import React from 'react';
import ReactDOM from 'react-dom';
import { BrowserRouter as Router, Route } from 'react-router-dom';
import './website.css';
import Websites from './components/websites';
import Create from './components/create';
import Update from './components/update';
import reportWebVitals from './reportWebVitals';

ReactDOM.render(
	<React.StrictMode>
		<Router>
			<Route exact path='/' component={Websites} />
			<Route path='/create' component={Create} />
			<Route path='/update/:id' component={Update} />
		</Router>
	</React.StrictMode>,
	document.getElementById('root')
);

// If you want to start measuring performance in your app, pass a function
// to log results (for example: reportWebVitals(console.log))
// or send to an analytics endpoint. Learn more: https://bit.ly/CRA-vitals
reportWebVitals();
Retrieving Websites
Create below websites.js file under src/components directory, which will hold all the logic to retrieve all websites and display on a HTML table. In each row we will provide two links – edit, for updating the existing website and delete, for deleting the existing website.
I will also provide Create Website link on top of the table, using which you will be able to add new website information to the server side.
You may find more on componentDidMount. We have exported the class as export default <component name> to use (import) it elsewhere as you have seen in the index.js file.
import React from 'react';
import { Link } from 'react-router-dom';
class Websites extends React.Component {
constructor(props) {
super(props);
this.state = {websites: []};
this.headers = [
{ key: 'id', label: 'Id'},
{ key: 'title', label: 'Title' },
{ key: 'url', label: 'URL' }
];
this.deleteWebsite = this.deleteWebsite.bind(this);
}
componentDidMount() {
fetch('http://localhost:8080/websites')
.then(response => {
return response.json();
}).then(result => {
console.log(result);
this.setState({
websites:result
});
});
}
deleteWebsite(id) {
if(window.confirm("Are you sure want to delete?")) {
fetch('http://localhost:8080/website/delete/' + id)
.then(response => {
if(response.status === 200) {
alert("Website deleted successfully");
window.location.href = '/';
}
});
}
}
render() {
if(this.state.websites && Object.keys(this.state.websites).length > 0) {
return (
<div id="container">
<Link to="/create">Add Website</Link>
<p/>
<table>
<thead>
<tr>
{
this.headers.map(function(h) {
return (
<th key = {h.key}>{h.label}</th>
)
})
}
<th>Actions</th>
</tr>
</thead>
<tbody>
{
this.state.websites.map(function(item, key) {
return (
<tr key = {key}>
<td>{item.id}</td>
<td>{item.title}</td>
<td>{item.url}</td>
<td>
<Link to={`/update/${item.id}`}>Edit</Link>
<button onClick={this.deleteWebsite.bind(this, item.id)}>Delete</button>
</td>
</tr>
)
}.bind(this))
}
</tbody>
</table>
</div>
)
} else {
return (
<div id="container">
<Link to="/create">Add Website</Link><p/>
<div style={{color:'red'}}>No record found</div>
</div>
)
}
}
}
export default Websites;Creating Website
You need to create below js file under src/components directory, which will hold all the logic to add new website information. It will display a form where user inputs website information and click on Submit button to add the website information.
Once you add successfully, an alert box will show you successful message.
You will also be given a link that will take you to the list of websites page.
import React from 'react';
import { Link } from 'react-router-dom';

class Create extends React.Component {
  constructor(props) {
    super(props);
    this.state = {title: '', url:''};
    this.handleChange = this.handleChange.bind(this);
    this.handleSubmit = this.handleSubmit.bind(this);
  }

  handleChange(event) {
	  const state = this.state
	  state[event.target.name] = event.target.value
	  this.setState(state);
  }

  handleSubmit(event) {
	  event.preventDefault();
	  fetch('http://localhost:8080/website/add', {
			method: 'POST',
			body: JSON.stringify({
				title: this.state.title,
				url: this.state.url
			}),
			headers: {
				"Content-type": "application/json; charset=UTF-8"
			}
		}).then(response => {
				if(response.status === 201) {
					alert("New website saved successfully");
					window.location.href = '/';
				}
			});
  }

  render() {
    return (
		<div id="container">
		  <Link to="/">Websites</Link>
			  <p/>
			  <form onSubmit={this.handleSubmit}>
				<p>
					<label>Title:</label>
					<input type="text" name="title" value={this.state.title} onChange={this.handleChange} placeholder="Title" />
				</p>
				<p>
					<label>URL:</label>
					<input type="text" name="url" value={this.state.url} onChange={this.handleChange} placeholder="URL" />
				</p>
				<p>
					<input type="submit" value="Submit" />
				</p>
			  </form>
		   </div>
    );
  }
}

export default Create;
Updating Website
Create below js file under src/components directory, which will hold all the logic to update existing website information. It will display a form where user modifies the existing website information and click on Submit button to update the website information.
I passed website id value with the browser URL as a path parameter and that’s why we have the route path as /update/:id in the index.js file. Accordingly we have added Link element in the table for editing exiting information. Using this id value we first fetch the website information from server and populate the form fields in update page.
import React from 'react';
import { Link } from 'react-router-dom';

class Update extends React.Component {

  constructor(props) {
    super(props);
    this.state = {id: '', title: '', url: ''};
    this.handleChange = this.handleChange.bind(this);
    this.handleSubmit = this.handleSubmit.bind(this);
  }

  componentDidMount() {
	fetch('http://localhost:8080/website/search/' + this.props.match.params.id)
		.then(response => {
			return response.json();
		}).then(result => {
			console.log(result);
			this.setState({
				id:result.id,
				title:result.title,
				url:result.url
			});
		});
  }

  handleChange(event) {
	  const state = this.state
	  state[event.target.name] = event.target.value
	  this.setState(state);
  }

  handleSubmit(event) {
	  event.preventDefault();
	  fetch('http://localhost:8080/website/update', {
			method: 'POST',
			body: JSON.stringify({
				id:this.state.id,
				title: this.state.title,
				url: this.state.url
			}),
			headers: {
				"Content-type": "application/json; charset=UTF-8"
			}
		}).then(response => {
				if(response.status === 200) {
					alert("Website update successfully.");
					window.location.href = '/';
				}
			});
  }

  render() {
    return (
		<div id="container">
		  <Link to="/">Websites</Link>
			  <p/>
			  <form onSubmit={this.handleSubmit}>
				<input type="hidden" name="id" value={this.state.id}/>
					<p>
					<label>Title:</label>
						<input type="text" name="title" value={this.state.title} onChange={this.handleChange} placeholder="Title" />
					</p>
					<p>
						<label>URL:</label>
						<input type="text" name="url" value={this.state.url} onChange={this.handleChange} placeholder="URL" />
					</p>
					<p>
						<input type="submit" value="Submit" />
					</p>
			  </form>
		   </div>
    );
  }
}

export default Update;
Once you update successfully, an alert box will show you successful message.
You will also be given a link that will take you to the list of websites page.
Deleting Website
You click on the Delete link given on table at each row on the right side to delete the existing website information. When you click on the Delete link you will be shown an alert box to get confirmation whether you really want to delete. If you click on yes then only website information will get deleted from server otherwise you will stay on the same page.
The delete functionality is given in the websites.js file.
Notice how I have used normal anchor link <a/> to create delete link for deleting website information.
Note: if you receive module react-router-dom is not found then you can install it using command npm install --save react-router-dom. This will install latest version but I am using version 5.x, so I have used the command npm install --save react-router-dom@5.
Testing Spring Boot React CRUD Application
Now you have to first deploy the Spring Boot application. So just run the main class and relax. Here you will find the feeling of Spring Boot + ReactJS example.
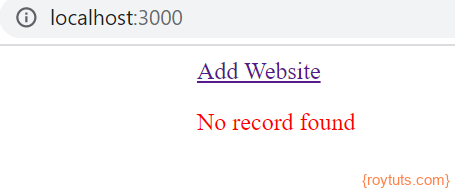
Next to run your ReactJS application, navigate to the directory spring-boot-react-crud-app in cmd window and execute the command npm start. A browser with URL http://localhost:3000/ will automatically open and a home page gets displayed with no website.
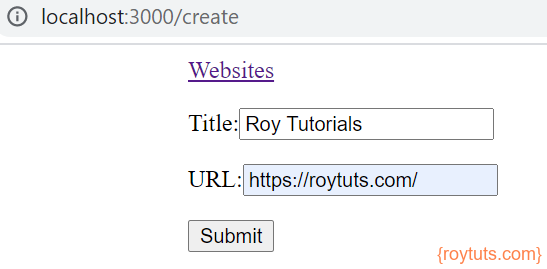
Now try to add a new website by clicking on the link Add Website, you have to fill title and URL of the website and click on Submit button. A new website gets created and you will see an alert box showing “New website saved successfully” and you will be redirected to the home page after 3 seconds.
Now you will find the website in the home page.

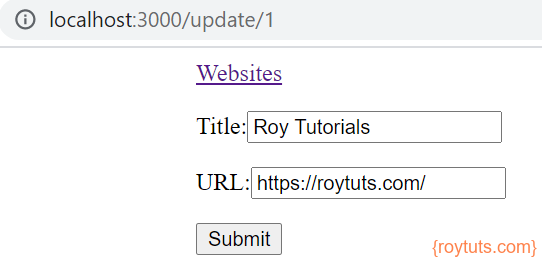
Next you may want to update the existing website. So let’s update by clicking on the edit link given on the right side of the table row. A form with auto-populated existing website information will be opened and once you update by clicking on the Submit button, you will see an alert box showing “Website updated successfully”. You will again redirected to the home page after 3 seconds.
Now if you want to delete the website then you may click on Delete link. When you click on Delete link you will get an alert box for confirmation whether you really want to delete or not? Once done you will be redirected to the hom page.

When you click yes then above row will get deleted and you will be left with no more website.
Improvements
There are many areas you can improve in the example Spring Boot + ReactJS CRUD Example. Some of the them are given below:
1. Look and feel of the UI
2. Validation of the input fields
3. When you add or update website information then you can navigate to the list of websites page
4. Error handling, currently I am only checking http status 200
5. Apply security with roles
…more